[Updated 19 May 2024]
I previously wrote about using Auth.js with Sveltekit. I originally encountered Auth.js when it was still just NextAuth and it was my go-to solution for authentication in my Next.js projects.
Why Auth.js? Well, usually you would like to own your app’s data. Users are a very important piece of data and letting a 3rd party vendor control that data and entrust them with the security of their sensitive information may sometimes not be the best thing for your use case. Usually those 3rd party services will also require payment, bringing up costs. Auth.js is a secure, open source authentication solution that is easy to use, supports many services (various OAuth providers), and is very flexible (many supported databases).
Our aims for this project:
- Authenticate with Google OAuth
- Authenticate with Magic Links
- Persist Users in a database (MongoDB)
- Create our own custom login screen
You can check out the final code here.
⚙️Tech: Next 14 (App router) | NextAuth V5 | MongoDB | Brevo | Typescript | Tailwind CSS
We’ll begin by creating our project
npx create-next-app@latest
At the time of writing, this will set up a Next 14 project. I chose to use Typescript, Tailwind CSS, a ‘src/’ directory, and the App router.
And let’s install Auth.js. Note that the original NextAuth is being migrated and updated to Auth.js, which supports additional frameworks (There might be some mix-ups and confusions in terms of calling the package NextAuth or Auth.js, I’ll just use them interchangeably). We’ll use the latest NextAuth v5 at the time of writing for this example.
npm install next-auth@beta
Now we need to set up Auth.js. We have a few options to control user authentication flow:
- OAuth
OAuth (Open Authorization) is an industry-standard protocol that enables secure and delegated access to a user’s resources on one website by another website, without sharing the user’s credentials.
- Magic Links
Magic Links are a type of authentication method that allows users to securely log in to a website or application by clicking on a unique, time-sensitive link sent to their email address or other communication channels, eliminating the need for a traditional password
- Credential authentication
Credential authentication is the traditional method where users provide their own username and password.
We’ll cover the OAuth and Magic Links here.
Authentication With OAuth (Google)
Auth.js offers a comprehensive list of popular 3rd party services it can support out of the box (Google, Facebook, Github, etc.). You can check the documentation for each one. Let’s set up the Google Provider, as it is arguably one of the most popular OAuth providers.
Create the config file
src/app/api/auth/[...nextauth]/auth.ts
// src/app/api/auth/[...nextauth]/auth.ts

import NextAuth from "next-auth";
import Google from "next-auth/providers/google";

export const {
  handlers: { GET, POST },
  auth,
} = NextAuth({
  providers: [Google],
});
Then export the route handlers from src/app/api/auth/[...nextauth]/route.ts
// src/app/api/auth/[...nextauth]/route.ts

export { GET, POST } from "./auth";
And add a .env.local file at the root of your project.
# Auth.js
AUTH_GOOGLE_CLIENT_ID="your-client-id"
AUTH_GOOGLE_CLIENT_SECRET="your-client-secret"
💡Auth.js tip
Auth.js can automatically infer environment variables that are prefixed with _AUTH__, so you don’t have to plug them in to the provider in the config. For OAuth providers, follow this format: _AUTH_{PROVIDER}_{ID|SECRET}_
💡Typescript tip
To get intellisense and type safety for your environment variables, create a env.d.ts file at the root of your project and declare the types for process.env. Now you will have intellisense when typing process.env.{variable}.
// env.d.ts

declare namespace NodeJS {
  interface ProcessEnv {
    AUTH_GOOGLE_ID: string;
    AUTH_GOOGLE_SECRET: string;
  }
}
You’ll need to get a Google client ID and a Google client secret. This is pretty easy to get from the Google Identity developer console. Create a new web project and copy the Google Client credentials to your .env.local file.
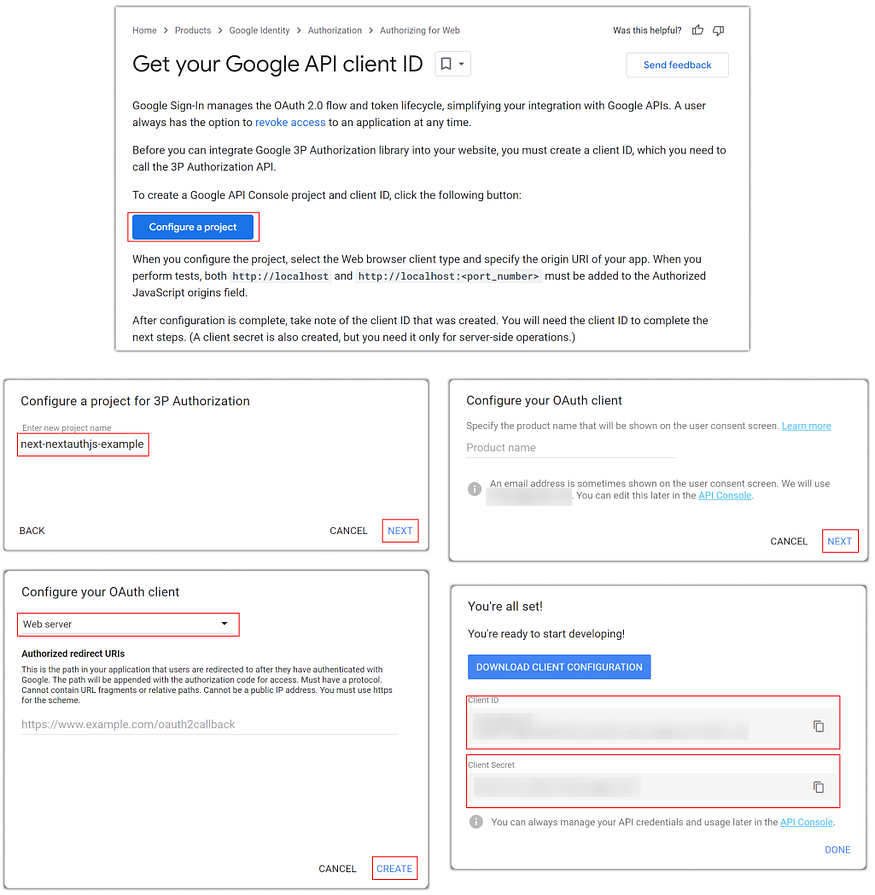
Steps to get a Google API client ID
You can manage the project on Google Cloud on the API console. Note that the project is automatically in “testing” mode and limited to 100 OAuth sign ins. When going to production set up the project accordingly and verify your app with Google. Before we can sign in, we need to define the domain from which the request will be made, and our redirect URL. In the API console, go to the credentials menu and choose your project (by default named OAuth). There, set the Authorized JavaScript origins to http://localhost:3000 and the Authorized redirect URIs to http://localhost:3000/api/auth/callback/google.
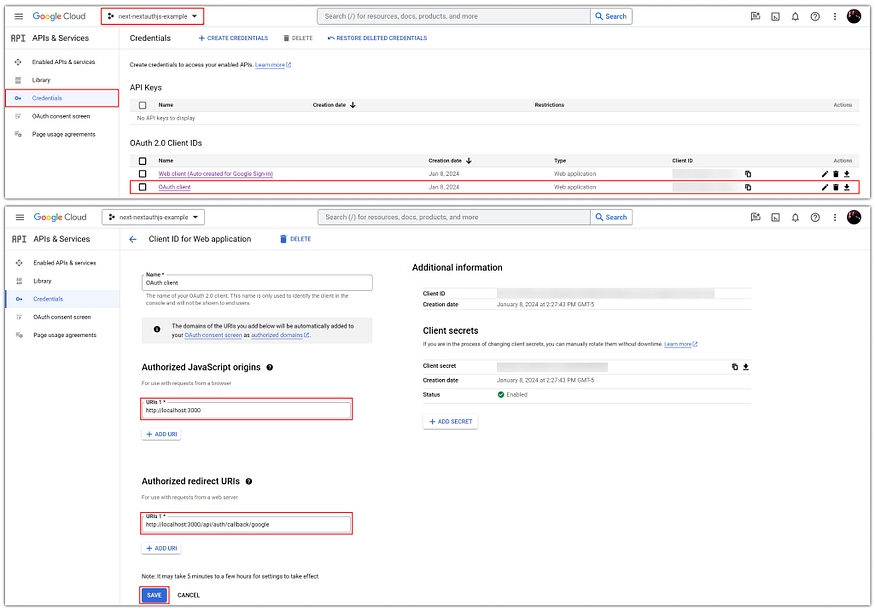
Managing Google OAuth Client
We’ll also need another environment variable for Auth.js to work and that is the AUTH_SECRET. This is used to hash tokens, sign cookies and generate cryptographic keys. It should be a minimum of 32 characters long. You can get a randomly generated one here.
And that’s pretty much it! Auth.js exposes default unbranded pages like the sign in (api/auth/signin) and sign out (api/auth/signout) pages. Now to test it out, we can go to http://localhost:3000/api/auth/signin and click on the sign in with Google button and you should see the all-so-familiar Google OAuth sign in screen.
Testing Authentication
OK, we wrote some code and set up some magic through Google. Does it actually work though? Let’s set up a small test.
We’ll just change a bit the homepage src/app/page.tsx
// src/app/page.tsx

export default function Page() {
  return (
    <main className="flex flex-col gap-3">
      <h1>Public</h1>
      <a href="/api/auth/signin">sign in</a>
      <a href="/protected">protected route</a>
    </main>
  );
}
And add a protected route and page src/app/protected/page.tsx.
// src/app/protected/page.tsx

export default function Page() {
  return (
    <main>
      <h1>Protected</h1>
      <a href="/api/auth/signout">sign out</a>
      <a href="/">public route</a>
    </main>
  );
}
Right now, anyone can visit this protected page. We want to protect all the pages under the /protected route. To do this, we can leverage Next layouts and check if there is a currently active user session. If there is no session, we’ll redirect the user to the sign in page. NextAuth v5 makes it much simpler compared to previous versions to get the session with a single function call auth(). Remember, this Layout function runs as a React Server Component by default, so we are getting a check on authentication status on the server before responding with any data.
Add src/app/protected/layout.tsx.
// src/app/protected/layout.tsx

import { redirect } from "next/navigation";
import { auth } from "../api/auth/[...nextauth]/auth";

export default async function Layout({
  children,
}: {
  children: React.ReactNode;
}) {
  const session = await auth();

  if (!session) return redirect("/");

  return <>{children}</>;
}
That’s it! Test it out and see that you can only access the protected route after signing in.
The session object will hold information about the session and user. You can add more information to the session object as needed. Especially if you need additional information about the user if you are managing users in a database.
// session object from auth()

{
user: {
name: string
email: string
image: string
},
expires: Date  // This is the expiry of the session
}
Persisting Users in a Database (MongoDB)
Auth.js uses two main strategies to maintain user sessions: stateless Json Web Tokens (JWT) and/or database session persistence. See this discussion on the pros and cons of each. If we’d like to manage sessions remotely as an admin, or easily add custom information to our users schema, database persistence may be in order. Auth.js has adapters for popular databases, making user database persistence simple. You can even create your own, as Auth.js has no opinions about databases. Let’s see an example with MongoDB. I’ll assume you have some familiarity with setting up a MongoDB database, and if not, no worries, the internet is full of tutorials. We’re just showing the gist of things here for Auth.js.
First we’ll need to install the adapter and mongodb driver
npm install @auth/mongodb-adapter mongodb
Auth.js will need some help to use the mongodb adapter. It will need to know how to connect to our database. For this, we can create a file that will export a promise of the MongoClient instance.
Add src/lib/database/mongoClientPromise.ts.
// src/lib/database/mongoClientPromise.ts

// This approach is taken from https://github.com/vercel/next.js/tree/canary/examples/with-mongodb
import { MongoClient } from "mongodb";

declare global {
  var _mongomongoClientPromise: Promise<MongoClient>;
}

if (!process.env.MONGODB_CONNECTION_STRING) {
  throw new Error(
    'Invalid/Missing environment variable: "MONGODB_CONNECTION_STRING"'
  );
}

const uri = process.env.MONGODB_CONNECTION_STRING;
const options = {};

let client: MongoClient;
let mongoClientPromise: Promise<MongoClient>;

if (process.env.ENVIRONMENT === "development") {
  // In development mode, use a global variable so that the value
  // is preserved across module reloads caused by HMR (Hot Module Replacement).
  if (!global._mongomongoClientPromise) {
    client = new MongoClient(uri, options);
    global._mongomongoClientPromise = client.connect();
  }
  mongoClientPromise = global._mongomongoClientPromise;
} else {
  // In production mode, it's best to not use a global variable.
  client = new MongoClient(uri, options);
  mongoClientPromise = client.connect();
}

// Export a module-scoped MongoClient promise. By doing this in a
// separate module, the client can be shared across functions.
export default mongoClientPromise;
And of course for this to work we’ll need to update our .env.local file with the required environment variables.
# Environment
ENVIRONMENT="development"

# Database
MONGODB_CONNECTION_STRING="your-mongodb-connection-string"

# Auth.js
AUTH_SECRET="your-at-least-32-characters-long-secret"
AUTH_GOOGLE_ID="your-client-id"
AUTH_GOOGLE_SECRET="your-client-secret"
Now let’s add the adapter in our Auth.js configuration
// src/app/api/auth/[...nextauth]/auth.ts

import mongoClientPromise from "@/lib/database/mongoClientPromise";
import { MongoDBAdapter } from "@auth/mongodb-adapter";
import NextAuth from "next-auth";
import Google from "next-auth/providers/google";

export const {
  handlers: { GET, POST },
  auth,
} = NextAuth({
  providers: [Google],
  adapter: MongoDBAdapter(mongoClientPromise, {
    databaseName: process.env.ENVIRONMENT,
  }),
});
And voila! It’s that simple. Now after you sign in with Google, you’ll see a sessions, accounts and users collections in the database.
Authentication With Magic Links (Brevo)
We have ourselves some OAuth authentication going and user data in our database. What if our users don’t have an OAuth login or they forgot their OAuth login credentials? Well, we can give those users an option to log in with just an email address!
Briefly, the way it works in Auth.js is that when signing in, an email with a Verification Token is sent. The token is valid for 24 hours by default. If used within that time, a new account is created and the user is signed in. If signing in with an already existing account’s email the user is signed in to that account.
💡Auth.js tip — Magic Links and Account Linking
If a user initially signs in with Google, and then tries to sign in with just their email with a magic link — no problem. If they initially sign in with just their email with a magic link, and then try with Google — it won’t work by default! This is a security measure because we can’t know if the 3rd party (Google in this case) has validated the email associated with the OAuth account. A bad actor could then create an OAuth account using someone else’s email and then use that to log into their account in our app. If you want to implement account linking — i.e. linking between the magic links and OAuth, you can either use your own logic, or if you know the OAuth provider validates emails and you accept the risk that they are responsible, you can add a flag to the Auth.js config: allowDangerousEmailAccountLinking and set it to true.
For magic links, we must set up a database to store verification tokens. Luckily, we already setup a database in the section above. We also need a way to send emails. We’ll use the Auth.js Nodemailer Provider for this. We just need to configure it with an SMTP account.
SMTP (Simple Mail Transfer Protocol) is a communication protocol used for sending and receiving email messages over a network. It defines the rules and conventions for how emails are transmitted and delivered between email servers. In many online tutorials you will see SendGrid appearing quite a bit as an SMTP server of choice and I have used it before too (you can check the Sveltekit version of this article). But, I have had less than optimal experience with SendGrid, with emails not always delivered and random blocking of my account. So for this example, we’ll use Brevo. They also have a very generous free tier!
So Let’s just add the Auth.js magic in the configuration file!
First, we need to install nodemailer
npm install nodemailer
Then we need to get our SMTP account credentials. You can use whichever you like, but you can quickly set up an account on Brevo:
- Create an account
- Verify sender (and optionally a domain) — Top right menu -> Senders, Domains and Dedicated IPs -> Sender -> Add Sender
- Get your credentials — Top right menu -> SMTP and API
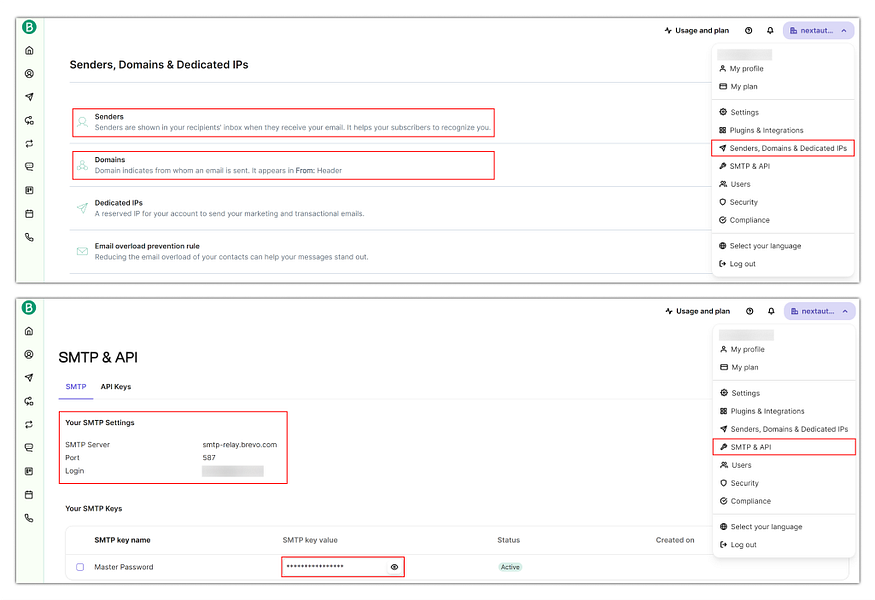
Managing Brevo SMTP Settings
Update the .env.local file with the SMTP information.
# Environment
ENVIRONMENT="development"

# Database
MONGODB_CONNECTION_STRING="your-mongodb-connection-string"

# Auth.js
AUTH_SECRET="your-at-least-32-characters-long-secret"
AUTH_GOOGLE_ID="your-client-id"
AUTH_GOOGLE_SECRET="your-client-secret"

# Brevo SMTP
SMTP_USER="your-brevo-user"
SMTP_PASSWORD="your-brevo-key"
SMTP_HOST=smtp-relay.sendinblue.com
SMTP_PORT=587
SMTP_FROM="your-verified-sender"
Now we’re ready to configure Auth.js to use the Nodemailer Provider.
// src/app/api/auth/[...nextauth]/auth.ts

import mongoClientPromise from "@/lib/database/mongoClientPromise";
import { MongoDBAdapter } from "@auth/mongodb-adapter";
import NextAuth from "next-auth";
import Google from "next-auth/providers/google";
import NodemailerProvider from "next-auth/providers/nodemailer";

export const {
  handlers: { GET, POST },
  auth,
} = NextAuth({
  providers: [
    Google,
    NodemailerProvider({
      server: {
        host: process.env.SMTP_HOST,
        port: process.env.SMTP_PORT,
        auth: {
          user: process.env.SMTP_USER,
          pass: process.env.SMTP_PASSWORD,
        },
      },
      from: process.env.SMTP_FROM,
    }),
  ],
  adapter: MongoDBAdapter(mongoClientPromise, {
    databaseName: process.env.ENVIRONMENT,
  }),
});
Now if we go to the default sign in screen, we’ll see an option of signing in with just an email. Test it out!
Building a Custom Authentication Experience
Usually we would like to have a custom and branded experience to welcome users. So let’s go about making a nicer looking authentication experience.
In this case, we would also probably want to remove the default pages provided by Auth.js. So first, let’s direct the sign in and sign out pages to a custom route. In our Auth.js config, we can add a pages field and assign a route to them. I’m going to direct both the sign in and sign out to a single route /auth. This will overwrite the default pages (try it out, you’ll get a 404 for /api/auth/signin).
// src/app/api/auth/[...nextauth]/auth.ts

import mongoClientPromise from "@/lib/database/mongoClientPromise";
import { MongoDBAdapter } from "@auth/mongodb-adapter";
import NextAuth from "next-auth";
import Google from "next-auth/providers/google";
import NodemailerProvider from "next-auth/providers/nodemailer";

export const {
  handlers: { GET, POST },
  auth,
} = NextAuth({
  providers: [
    Google,
    NodemailerProvider({
      server: {
        host: process.env.SMTP_HOST,
        port: process.env.SMTP_PORT,
        auth: {
          user: process.env.SMTP_USER,
          pass: process.env.SMTP_PASSWORD,
        },
      },
      from: process.env.SMTP_FROM,
    }),
  ],
  adapter: MongoDBAdapter(mongoClientPromise, {
    databaseName: process.env.ENVIRONMENT,
  }),
  pages: {
    signIn: "/auth",
    signOut: "/auth",
  },
});
Now we need an actual route and page under /auth. So let’s add that.
// src/app/auth/page.tsx

export default function Page() {
  return (
    <main className="flex flex-col gap-3">
      <h1>My Custom Auth Page</h1>
    </main>
  );
}
Great! We’ll handle the sign in and sign out here. I’m thinking we should first conditionally render the sign in UI if we are not logged in, and the sign out UI if we are logged in. To do that, we need to check if there is an active session.
We already accessed the session, if you recall, when we handled redirects from protected routes. We can use similar code here to check if we are logged in when visiting the /auth route.
// src/app/auth/page.tsx

import { auth } from "../api/auth/[...nextauth]/auth";

export default async function Page() {
  const session = await auth();

  return (
    <main className="flex flex-col gap-3">
      <h1>My Custom Auth Page</h1>
      {!session && <p>Not logged in!</p>}
      {session && <p>Logged in!</p>}
    </main>
  );
}
We need a form to log in with the Magic Links — we’ll need an input for the email and a submit button. We’ll also add a button to do the Google OAuth sign in. Because we’ll probably use some state in our form, let’s make a separate component for it and pass to it our session. This way, we can use a server component when fetching the session, and a client component for the form.
// src/app/auth/page.tsx

import AuthForm from "@/components/AuthForm";
import { auth } from "../api/auth/[...nextauth]/auth";

export default async function Page() {
  const session = await auth();

  return (
    <main className="flex flex-col gap-3">
      <h1>My Custom Auth Page</h1>
      <AuthForm session={session} />
    </main>
  );
}
// src/components/AuthForm.tsx

"use client";

import { Session } from "next-auth";
import { useState } from "react";

interface Props {
  session: Session | null;
}

export default function AuthForm({ session }: Props) {
  const [email, setEmail] = useState("");

  const handleEmailSignIn = () => {
    // handle email sign in
  };

  const handleGoogleSignIn = () => {
    // hande Google sign in
  };

  const handleSignOut = () => {
    // hande sign out
  };

  return (
    <div>
      {!session && (
        <>
          <form onSubmit={handleEmailSignIn}>
            <input
              name="email"
              type="email"
              value={email}
              onChange={(e) => setEmail(e.target.value)}
            />
            <button>Continue</button>
          </form>
          <button onClick={handleGoogleSignIn}>Continue with Google</button>
        </>
      )}

      {session && <button onClick={handleSignOut}>Sign out</button>}
    </div>
  );
}
We’re getting somewhere! Now we just need to handle the sign in and sign out. Auth.js makes this super simple by exposing the [signIn()](https://authjs.dev/reference/nextjs#signin) and [signOut()](https://authjs.dev/reference/nextjs#signout) functions. Let’s fill in the blanks.
// src/components/AuthForm.tsx

"use client";

import { Session } from "next-auth";
import { signIn, signOut } from "next-auth/react";
import { FormEvent, useState } from "react";

interface Props {
  session: Session | null;
}

export default function AuthForm({ session }: Props) {
  const [email, setEmail] = useState("");

  const handleEmailSignIn = async (e: FormEvent<HTMLFormElement>) => {
    e.preventDefault(); // prevent form submission from refreshing the page
    await signIn("nodemailer", { email, callbackUrl: "/protected" });
  };

  const handleGoogleSignIn = async () => {
    await signIn("google", { callbackUrl: "/protected" });
  };

  const handleSignOut = async () => {
    await signOut({ callbackUrl: "/" });
  };

  return (
    <div>
      {!session && (
        <>
          <form onSubmit={handleEmailSignIn}>
            <input
              required
              name="email"
              type="email"
              value={email}
              onChange={(e) => setEmail(e.target.value)}
            />
            <button>Continue</button>
          </form>
          <button onClick={handleGoogleSignIn}>Continue with Google</button>
        </>
      )}

      {session && <button onClick={handleSignOut}>Sign out</button>}
    </div>
  );
}
- The
signIn()function accepts 3 parameters —providerId,options, andauthorizationParams. - For OAuth, we call the
signIn()function and pass in the name of the provider. In this case “google”, and we want to redirect the user to the/protectedroute after sign in:signIn(“google”, { callbackUrl: “/protected” }). - For Magic Links, we need to pass in the provider first — “email” and the information on where to send the Magic Link to. We can also set to which URL we want to go to from that magic link. So we call
signIn(“nodemailer”, { email, callbackUrl: “/protected” })
And that’s it. You may notice that with the Magic Link, after sign in you are redirected to a default page exposed by Auth.js to tell you to check your email. I’ll leave it as an exercise for the reader to create a custom page for that route. Additionally, if you want to customize the Magic Link email, be sure to check out the documentation.
As for the signing out? It’s a simple call to signOut().
Now all that is left is to beautify! You can check out the final example repository for all the beautification stuff.
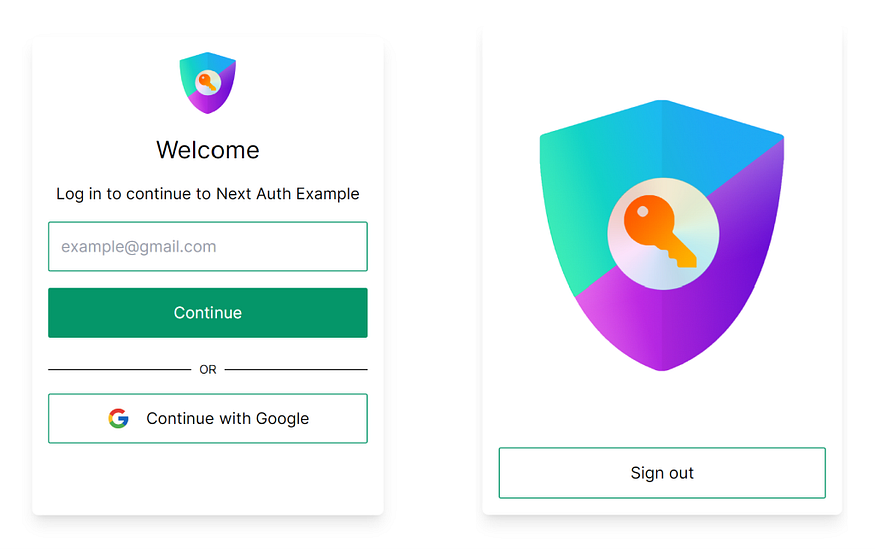
Final sign in and sign out cards
If you like what you read, be sure to follow and bestow upon me the gift of claps! Feel free to connect with me on Twitter or LinkedIn 🥰
Comments
Loading comments…