Have you ever wanted to visualize audio waveforms in your iOS app? Whether it’s for a music player, podcast app, or any audio-related application, an audio waveform visualizer adds a touch of elegance and user engagement. In this tutorial, we’ll walk through how to create a dynamic audio waveform visualizer in Swift using UIKit and AVFoundation. We’ll cover everything from setting up the view to generating the waveform and displaying it. Let’s dive in!
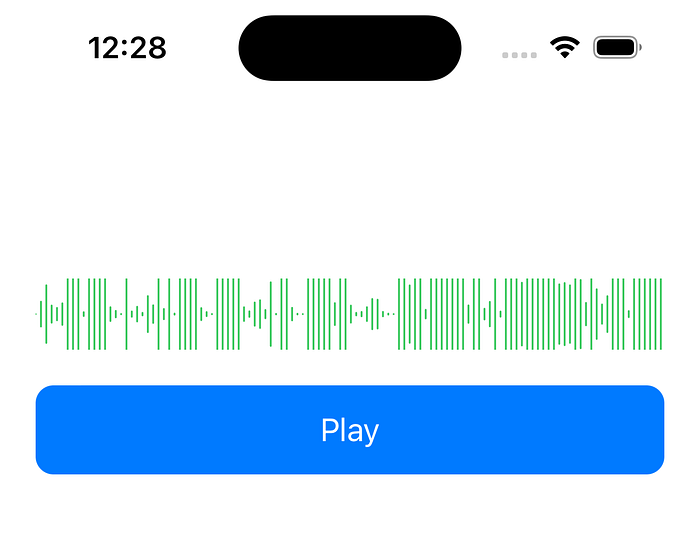
The general idea is to create a UI similar to the following one.
Reading Buffers from Audio: Understanding the Audio Data
One of the core components of our dynamic audio waveform visualizer is the ability to read audio data from a file. This data is crucial for generating the waveform visualization accurately. In this section, we’ll take a closer look at how to read buffers from an audio file using the AVFoundation framework.
Buffer: What Is It?
In audio processing, a buffer is essentially a block of memory that holds audio samples. Each sample represents the amplitude of the audio signal at a specific point in time. By reading these samples, we can create a detailed representation of the audio waveform.
The AVFoundation Framework: Your Audio Ally
To read audio buffers, we rely on the AVFoundation framework in Swift. This framework provides a set of classes and methods for working with audio files, making audio playback, recording, and analysis possible.
Reading Buffers: The Code Walkthrough
Let’s take a closer look at the code responsible for reading audio buffers using the AVAudioFile and AVAudioPCMBuffer classes:
private func readBuffer(_ audioUrl: URL,completion:@escaping (_ wave:UnsafeBufferPointer<Float>?)->Void)  {
    DispatchQueue.global(qos: .utility).async {
        guard let file = try? AVAudioFile(forReading: audioUrl) else {
            completion(nil)
            return
        }
        let audioFormat = file.processingFormat
        let audioFrameCount = UInt32(file.length)
        guard let buffer = AVAudioPCMBuffer(pcmFormat: audioFormat, frameCapacity: audioFrameCount)
        else { return completion(UnsafeBufferPointer<Float>(_empty: ())) }
        do {
            try file.read(into: buffer)
        } catch {
            print(error)
        }

        let floatArray = UnsafeBufferPointer(start: buffer.floatChannelData![0], count: Int(buffer.frameLength))

        DispatchQueue.main.sync {
            completion(floatArray)
        }
    }
}
Drawing Audio Waves: Transforming Audio Data into Visual Waves
Now that we’ve successfully read audio data from the buffer, the next step is to transform this raw audio information into a visual waveform. This process involves converting audio samples into a series of lines that represent the waveform. Let’s take a deep dive into how we achieve this transformation and draw the audio waves.
The Drawing Mechanism:
Our visual representation of the audio is constructed using a series of lines, where each line corresponds to an individual audio sample. When we connect these lines, they collectively form the characteristic wave-like pattern that visually represents the audio waveform.
Drawing the Waves: The Code Walkthrough:
Our generateWaveImage function is where the magic unfolds.
func generateWaveImage(from audioUrl: URL,
                       imageSize: CGSize,
                       strokeColor: UIColor,
                       backgroundColor: UIColor,
                       waveWidth: CGFloat,      // Width of each wave
                       waveSpacing: CGFloat,    // Space between waveform items
                       completion: @escaping (_ image: UIImage?) -> Void) {
    readBuffer(audioUrl) { samples in
        guard let samples = samples else {
            completion(nil)
            return
        }

        autoreleasepool {
            UIGraphicsBeginImageContextWithOptions(imageSize, false, 0)
            guard let context: CGContext = UIGraphicsGetCurrentContext() else {
                completion(nil)
                return
            }

            let middleY = imageSize.height / 2

            context.setFillColor(backgroundColor.cgColor)
            context.setAlpha(1.0)
            context.fill(CGRect(origin: .zero, size: imageSize))
            context.setLineWidth(waveWidth)
            context.setLineJoin(.round)
            context.setLineCap(.round)

            let maxAmplitude = samples.max() ?? 0
            let heightNormalizationFactor = Float(imageSize.height) / maxAmplitude / 2

            var x: CGFloat = 0.0
            let samplesCount = samples.count
            let sizeWidth = Int(self.frame.size.width)
            var index = 0
            var sampleAtIndex = samples.item(at: index * samplesCount / sizeWidth)
            while sampleAtIndex != nil {

                sampleAtIndex = samples.item(at: index * samplesCount / sizeWidth)
                let normalizedSample = CGFloat(sampleAtIndex ?? 0) * CGFloat(heightNormalizationFactor)
                let waveHeight = normalizedSample * middleY

                context.move(to: CGPoint(x: x, y: middleY - waveHeight))
                context.addLine(to: CGPoint(x: x, y: middleY + waveHeight))

                x += waveSpacing + waveWidth

                index += 1
            }

            context.setStrokeColor(strokeColor.cgColor)
            context.strokePath()

            guard let soundWaveImage = UIGraphicsGetImageFromCurrentImageContext() else {
                UIGraphicsEndImageContext()
                completion(nil)
                return
            }

            UIGraphicsEndImageContext()
            completion(soundWaveImage)
        }
    }
}
You may wonder there is no method like item(at:) because there should be an extension for this:
extension UnsafeBufferPointer {
    func item(at index: Int) -> Element? {
        if index >= self.count {
            return nil
        }

        return self[index]
    }
}
Now it is time to combine everything into one class called WaveformView
class WaveformView: UIImageView {
    var audioURL: URL? {
        didSet {
            guard let url = audioURL else {
                return
            }
            generateWaveImage(from: url, imageSize: self.frame.size, strokeColor: color, backgroundColor: .clear, waveWidth: waveWidth, waveSpacing: waveSpacing) { image in
                self.image = image
            }
        }
    }
    private var color: UIColor
    private var waveWidth: CGFloat = 1
    private var waveSpacing: CGFloat

    init(color: UIColor, waveWidth: CGFloat = 1, waveSpacing: CGFloat = 2) {
        self.color = color
        self.waveWidth = waveWidth
        self.waveSpacing = waveSpacing
        super.init(frame: .zero)
    }

    required init?(coder: NSCoder) {
        fatalError("init(coder:) has not been implemented")
    }

    private func generateWaveImage(from audioUrl: URL,
                           imageSize: CGSize,
                           strokeColor: UIColor,
                           backgroundColor: UIColor,
                           waveWidth: CGFloat,      // Width of each wave
                           waveSpacing: CGFloat,    // Space between waveform items
                           completion: @escaping (_ image: UIImage?) -> Void) {
      // implementation of generateWaveImage
    }

    private func readBuffer(_ audioUrl: URL,completion:@escaping (_ wave:UnsafeBufferPointer<Float>?)->Void) {
      // implementation of readBuffer
    }
}
Putting It All Together: Practical Usage of the WaveformView
Now that we’ve explored the ins and outs of our dynamic audio waveform visualizer, let’s see how to integrate it into a practical use case. In this section, we’ll create a simple view controller that showcases how to use the WaveformView to visualize audio data and provide a button for audio playback.
Setting Up the View Controller:
class ViewController: UIViewController {
    private var player: AVAudioPlayer?

    lazy private var imageView: WaveformView = {
        let imageView = WaveformView(color: UIColor.systemGreen)
        imageView.contentMode = .scaleAspectFit
        imageView.translatesAutoresizingMaskIntoConstraints = false
        return imageView
    }()

    lazy private var playButton: UIButton = {
        let button = UIButton()
        button.setTitle("Play", for: .normal)
        button.translatesAutoresizingMaskIntoConstraints = false
        button.backgroundColor = .systemBlue
        button.setTitleColor(.white, for: .normal)
        button.layer.cornerRadius = 10
        button.addTarget(self, action: #selector(onClickPlay), for: .touchUpInside)
        return button
    }()

    // ... Other properties and methods

    override func viewDidLoad() {
        super.viewDidLoad()
        setupView()
    }

    // ... Rest of the code
}
Audio Visualization and Playback:
In the viewDidAppear method, we associate the WaveformView with an audio file to visualize its waveform:
override func viewDidAppear(_ animated: Bool) {
    super.viewDidAppear(animated)
    self.imageView.audioURL = Bundle.main.url(forResource: "sampleaudio", withExtension: "mp3")
}
@objc private func onClickPlay() {
    guard let url = Bundle.main.url(forResource: "sampleaudio", withExtension: "mp3") else {
        return
    }

    // Setting up AVAudioSession and AVAudioPlayer
    try? AVAudioSession.sharedInstance().setCategory(.playback, mode: .spokenAudio)
    try? AVAudioSession.sharedInstance().setActive(true)
    player = try? AVAudioPlayer(contentsOf: url)
    player?.prepareToPlay()
    player?.play()
}
private func setupView() {
    view.addSubview(imageView)
    view.addSubview(playButton)

    NSLayoutConstraint.activate([
        // ... Constraints for imageView and playButton
    ])
}
Conclusion:
By seamlessly integrating the WaveformView into our view controller, we've showcased how to create a visually engaging audio waveform visualization. The combination of audio visualization and playback brings an interactive element to our app, enhancing user engagement and overall user experience.
That's it for this topic. Thank you for reading.
Comments
Loading comments…