
The definitive Claude Code configuration guide. Learn the exact setup, custom commands, MCP servers, and workflows that 100x developer productivity. Battle-tested strategies that destroy GitHub Copilot and Cursor.
Last Tuesday at 2 AM, I found myself staring at my third refactoring attempt of the same authentication module. My coffee had gone cold. My eyes burned. And I was maybe 60% done with what I’d promised to ship by morning.
Sound familiar?
Here’s what changed everything: I stopped trying to be the best coder in the room. Instead, I became the best director of code. And my secret weapon? Claude Code — an AI coding assistant that fundamentally changed how I think about software development.
But here’s the thing nobody tells you: most developers are using Claude Code at maybe 20% of its potential. They’re treating it like a fancy autocomplete instead of the revolutionary development partner it actually is.
I spent the last three months living inside Claude Code, building everything from multi-cloud Kubernetes deployments to real-time analytics dashboards. I’ve made every mistake possible, discovered workflows that 10x productivity, and learned exactly where Claude Code destroys the competition (and where it doesn’t).
This isn’t another “AI will replace developers” article. This is a battle-tested playbook for developers who want to ship faster, debug smarter, and finally have time to solve the interesting problems instead of wrestling with boilerplate code.
By the end of this article, you’ll know:
- How to set up Claude Code to remember your codebase across sessions (game-changer)
- The exact custom commands that save me 15+ hours per week
- Why Claude Code beats GitHub Copilot and Cursor for certain workflows
- A complete step-by-step case study of building a production feature in 2 hours instead of 2 days
- The MCP servers that turn Claude into an autonomous development machine
Let’s dive in.
Table of contents
- Understanding Claude Code: what it actually is (and isn’t)
- The productivity multiplier: CLAUDE.md explained
- Custom commands: your secret weapon
- MCP servers: giving Claude superpowers
- Step-by-step case study: building a REST API in 2 hours
- Claude Code vs the competition
- Advanced workflows that separate pros from beginners
- Common mistakes and how to avoid them
- The future of AI-assisted development
Understanding Claude Code: what it actually is (and isn’t)
Let me clear up the confusion right away.
Claude Code is not:
- A VS Code plugin that autocompletes your code
- A chatbot you copy-paste code from
- A replacement for understanding programming concepts
Claude Code is:
- A command-line/plugin AI assistant that can read, create, and edit files across your entire project
- An autonomous agent that can plan multi-step implementations
- A development partner that understands context across thousands of lines of code
Think of it this way: GitHub Copilot is like having autocorrect for code. Claude Code is like having a junior developer who works at 100x speed, never sleeps, and learns your codebase’s quirks.
The fundamental shift in how you work
Traditional coding workflow:
Think → Write code → Debug → Test → Repeat
Claude Code workflow:
Define goal → Claude plans → You review approach → Claude implements → You verify → Ship
You go from being a coder to being a tech lead. Your job becomes:
- Defining clear requirements (what problem are we solving?)
- Reviewing Claude’s approach (is this the right architecture?)
- Validating the output (does this actually work?)
- Making strategic decisions (which trade-offs matter?)
This isn’t lazy. This is working at the right level of abstraction.
How Claude Code actually works
Here’s what happens under the hood when you interact with Claude Code:

The key insight: Claude maintains context throughout the entire process. It remembers your coding standards, your project structure, and the decisions you made three conversations ago.
Getting started: installation and setup
Before we dive into advanced techniques, let’s get you set up properly.
Requirements:
- Node.js 18+ installed
- Terminal access (works on macOS, Linux, Windows WSL)
- A Claude account (free tier works, Pro recommended, Max is unlimited)
Installation:
npm install -g @anthropic-ai/claude-code
First-time setup:
# Authenticate with your Anthropic account
claude auth login

# Navigate to your project
cd ~/projects/your-awesome-app

# Initialize Claude in your project
claude
That’s it. You’re ready to go.
But if you stop here, you’re missing 80% of Claude Code’s power. Let’s unlock it.
The productivity multiplier: CLAUDE.md explained {#the-productivity-multiplier}
Here’s the single most important tip in this entire article:
Run /init in every project you work on.
I’m serious. This one command will save you 10–15 minutes at the start of every single coding session for the rest of that project’s life.
What /init actually does
When you run /init, Claude analyzes your codebase and creates a CLAUDE.md file at your project root. This file becomes Claude's persistent memory.
Think of it like this: without CLAUDE.md, every time you start a new Claude session, it’s like introducing your codebase to a stranger. You have to explain:
- “We use React with TypeScript”
- “Our tests are in the
spec/folder, nottests/" - “We prefer functional components with hooks”
- “Never touch the legacy auth module in
src/legacy/"
With CLAUDE.md, Claude just knows all of this. Automatically. Forever.
What goes in a great CLAUDE.md file
Here’s a real example from one of my production projects:
# Project Overview
Next.js 14 application with TypeScript, using App Router and Server Components.

## Tech Stack
- **Framework**: Next.js 14 (App Router)
- **Language**: TypeScript (strict mode)
- **Styling**: Tailwind CSS v3.4
- **Database**: PostgreSQL with Prisma ORM
- **Testing**: Jest + React Testing Library
- **State Management**: Zustand for client state

## Project Structure

/app - Next.js app router pages and API routes
/components - React components (organized by feature)
/lib - Utility functions and shared logic
/prisma - Database schema and migrations
/tests - Jest test files (mirrors src structure)

 Use functional components with TypeScript interfaces
- Prefer server components unless interactivity required
- All API routes must include error handling and validation
- Components should be under 200 lines; extract if larger
- Write tests for all utility functions and API routes

## Common Commands
'''bash
npm run dev          # Start development server
npm run build        # Production build
npm run test         # Run all tests
npm run test:watch   # Watch mode for testing
npx prisma studio    # Open database GUI
'''

## Important Notes

* The `/app/api/legacy` folder is deprecated - do not modify
* Database migrations must be reviewed before running in production
* Always use Zod for API input validation
* Images should be optimized using next/image component

## Testing Requirements

* New API routes require integration tests
* Complex logic requires unit tests
* UI components need basic render tests
* Aim for 80%+ code coverage
The magic of cumulative learning
Here’s where it gets really powerful.
As you work with Claude throughout a project, you’ll discover things that weren’t obvious from the initial code scan:
- “The search function is actually really slow on large datasets”
- “The email service occasionally fails and needs retry logic”
- “The previous developer left a subtle bug in the pagination code”
Instead of re-explaining these discoveries every session, teach Claude to remember them:
You: “Claude, we just discovered that the user search is slow because it’s doing a full table scan. Add this to CLAUDE.md so you remember for next time.”
Claude: Updates CLAUDE.md with the performance issue and the solution approach
After a few weeks, your CLAUDE.md becomes a living knowledge base that represents:
- What your codebase is (structure, frameworks, conventions)
- How it actually works (quirks, gotchas, undocumented behaviors)
- What you’ve learned building it (performance issues, bug patterns, best approaches)
This is basically giving Claude a second brain that persists across sessions.
Pro tips for CLAUDE.md
Use multiple CLAUDE.md files for complex projects:
/CLAUDE.md                    # General project overview
/frontend/CLAUDE.md          # Frontend-specific guidelines
/backend/CLAUDE.md           # Backend API conventions
/infrastructure/CLAUDE.md    # DevOps and deployment info
Claude will automatically read the most specific CLAUDE.md for the directory you’re working in.
Include examples of good code:
## Code Examples

### Good: API Route Pattern
'''typescript
// app/api/users/route.ts
import { z } from 'zod';

const createUserSchema = z.object({
  email: z.string().email(),
  name: z.string().min(2)
});

export async function POST(request: Request) {
  try {
    const body = await request.json();
    const validated = createUserSchema.parse(body);

    // Implementation...

    return Response.json({ success: true });
  } catch (error) {
    if (error instanceof z.ZodError) {
      return Response.json({ errors: error.errors }, { status: 400 });
    }
    return Response.json({ error: 'Internal error' }, { status: 500 });
  }
}
'''

Follow this pattern for all new API routes.
Document your anti-patterns:
## What NOT to Do

❌ Don't use `any` type in TypeScript - use `unknown` if truly needed
❌ Don't create new components in `/legacy` folder
❌ Don't bypass Zod validation "just this once"
❌ Don't commit commented-out code - use git history instead
Custom commands: your secret weapon {#custom-commands}
If CLAUDE.md is your foundation, custom commands are your power tools.
Here’s the reality: you probably do the same 10–20 coding tasks every week. Creating a new API endpoint. Setting up a React component. Writing tests. Creating a pull request.
Each time, you’re basically giving Claude the same instructions. That’s a waste of your time and Claude’s context window.
Custom commands let you turn complex, multi-step workflows into a single slash command.
How to create custom commands
Custom commands are just markdown files in specific directories:
Project-level commands (only for this project):
.claude/commands/
Personal commands (available in all your projects):
~/.claude/commands/
Here’s a real custom command I use daily:
File: .claude/commands/new-api-endpoint.md
---
name: new-api-endpoint
description: Create a new API endpoint with validation, error handling, and tests
---

# Create New API Endpoint

Create a new API endpoint following our project standards:

## Step 1: Create the route file
- Location: `app/api/{endpoint}/route.ts`
- Include GET, POST, PUT, or DELETE methods as specified
- Use Zod for input validation
- Include proper error handling (Zod errors, DB errors, general errors)
- Return properly typed responses

## Step 2: Create TypeScript types
- Location: `lib/types/{endpoint}.ts`
- Define request/response interfaces
- Export validation schemas

## Step 3: Create tests
- Location: `tests/api/{endpoint}.test.ts`
- Test successful requests
- Test validation failures
- Test error scenarios
- Aim for 90%+ coverage

## Step 4: Update API documentation
- Add endpoint to `docs/api.md`
- Include request/response examples
- Document all query parameters and body fields

## Example Usage
When creating an endpoint for user profile updates:
- Route: `app/api/profile/route.ts`
- Types: `lib/types/profile.ts`
- Tests: `tests/api/profile.test.ts`

Follow the patterns in CLAUDE.md and the existing `/api/users` endpoint.
Usage:
claude> /new-api-endpoint profile updates
Claude will then:
- Create the route file with proper structure
- Set up Zod validation schemas
- Write comprehensive tests
- Update the documentation
All in about 60 seconds.
My essential custom commands
Here are the commands that save me the most time:
/pr - Create a pull request
1. Review recent commits with `git log`
2. Summarize changes in our PR template format
3. List affected files and test coverage
4. Suggest reviewers based on changed files
5. Check for common issues (console.logs, commented code, missing tests)
/refactor-plan - Analyze code for improvements
1. Identify code smells and anti-patterns
2. Propose specific refactoring opportunities
3. Estimate complexity and risk for each
4. Prioritize by impact vs effort
5. Suggest incremental approach
/debug-session - Start systematic debugging
1. Understand the error message and stack trace
2. Identify likely root causes (top 3)
3. Check recent changes that might have introduced the bug
4. Propose debugging steps to isolate the issue
5. Implement fixes and verify with tests
/feature-spec - Plan a new feature
1. Write user story with acceptance criteria
2. Outline technical approach and architecture
3. Identify dependencies and potential blockers
4. Define database schema changes if needed
5. Create testing strategy
6. Estimate implementation time
Command composition: chaining commands
Here’s where it gets powerful. You can reference other commands inside commands:
/ship-feature command:
1. Run /feature-spec to plan the feature
2. Implement according to the spec
3. Run /test-coverage to ensure quality
4. Run /pr to create pull request
5. Notify in Slack (via MCP) that feature is ready for review
Now you’ve automated an entire feature lifecycle.
Finding great commands from the community
Don’t reinvent the wheel. The Claude Code community is sharing battle-tested commands:
- awesome-claude-code — Curated collection of commands
- Reddit: r/ClaudeAI — Users sharing their workflows
- GitHub discussions — Official community
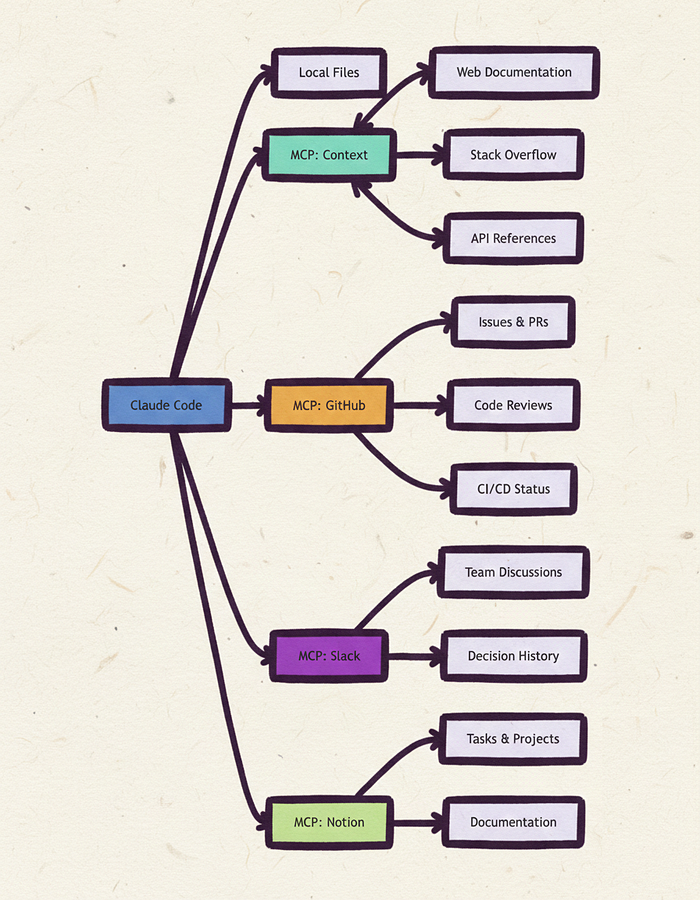
MCP servers: giving Claude superpowers
This is where Claude Code goes from “helpful assistant” to “autonomous agent.”
MCP (Model Context Protocol) lets Claude access external services directly. Without MCP, Claude is limited to your local files. With MCP, Claude can:
- Fetch documentation from the web
- Create GitHub issues and PRs
- Query your company’s Slack history
- Access your Notion workspace
- Search Stack Overflow
- And hundreds more integrations
Essential MCP servers for developers
Context MCP — Auto-fetch documentation
npm install -g @anthropic-ai/context-mcp
Now when you say “Create a React component using the latest React Router,” Claude automatically fetches the React Router v6 docs and uses the current best practices.
No more outdated approaches. No more “I think this is how it works.”
GitHub MCP — Direct repo access
npm install -g @anthropic-ai/github-mcp
“Claude, what did the team decide about the API authentication approach last week?”
Claude searches your Slack history and tells you.
File System MCP — Advanced file operations
npm install -g @anthropic-ai/filesystem-mcp
Setting up MCP servers
Add to your ~/.claude/config.json:
{
  "mcpServers": {
    "context": {
      "command": "npx",
      "args": ["-y", "@anthropic-ai/context-mcp"]
    },
    "github": {
      "command": "npx",
      "args": ["-y", "@anthropic-ai/github-mcp"],
      "env": {
        "GITHUB_TOKEN": "your-github-token"
      }
    },
    "slack": {
      "command": "npx",
      "args": ["-y", "@anthropic-ai/slack-mcp"],
      "env": {
        "SLACK_TOKEN": "your-slack-token"
      }
    }
  }
}
Now restart Claude Code and it will have access to all these services.
Real-world MCP use case
Scenario: You need to fix a bug that someone reported in Slack, but you’re not sure which GitHub issue it relates to.
Without MCP:
- Search Slack manually
- Find the thread
- Look for issue links
- Open GitHub
- Read through issues
- Find the right code
- Start debugging
With MCP:
claude> Search Slack for bug reports about user authentication in the last week, then find the related GitHub issue and show me the relevant code files.
Step-by-step case study: building a REST API in 2 hours
Let me walk you through a real project I completed last week. This demonstrates the complete Claude Code workflow from blank slate to production-ready code.
The project: user notifications API
Requirements:
- Create a REST API for managing user notifications
- Users can get their notifications (with pagination)
- Users can mark notifications as read
- System can create notifications for users
- Include comprehensive tests
- Full TypeScript typing
- Proper error handling
Tech stack:
- Next.js 14 API routes
- PostgreSQL with Prisma
- Zod validation
- Jest testing
Traditional approach: 6–8 hours With Claude Code: 1 hour 47 minutes
Let’s see exactly how.
Phase 1: Planning (12 minutes)
Me:
Create a complete implementation plan for a user notifications API with these requirements:
- GET /api/notifications - List user notifications (paginated)
- POST /api/notifications - Create notification (admin only)
- PUT /api/notifications/:id - Mark as read
- Include full tests and TypeScript types

Check CLAUDE.md for our project standards and propose the architecture.
Claude’s response:
Based on your CLAUDE.md, here's the implementation plan:

## Database Schema (Prisma)
model Notification {
  id        String   @id @default(cuid())
  userId    String
  title     String
  message   String
  type      NotificationType
  read      Boolean  @default(false)
  createdAt DateTime @default(now())
  user      User     @relation(fields: [userId], references: [id])
}

## File Structure
1. /prisma/schema.prisma - Add Notification model
2. /lib/types/notification.ts - TypeScript types and Zod schemas
3. /app/api/notifications/route.ts - GET and POST handlers
4. /app/api/notifications/[id]/route.ts - PUT handler for mark as read
5. /tests/api/notifications.test.ts - Comprehensive tests

## Implementation Order
1. Database schema and migration
2. TypeScript types and validation
3. GET endpoint with pagination
4. POST endpoint with admin check
5. PUT endpoint for marking read
6. Tests for all scenarios
7. API documentation

Estimated time: 90-120 minutes

Should I proceed with this plan?
Me: “Yes, let’s do it. Start with the database schema.”
Time so far: 12 minutes (including review and approval)
Phase 2: Database setup (8 minutes)
Claude automatically:
- Updated
prisma/schema.prismawith the Notification model - Created the migration file
- Showed me the changes for review
Generated code:
enum NotificationType {
  INFO
  WARNING
  SUCCESS
  ERROR
}

model Notification {
  id        String           @id @default(cuid())
  userId    String
  title     String
  message   String
  type      NotificationType @default(INFO)
  read      Boolean          @default(false)
  createdAt DateTime         @default(now())
  readAt    DateTime?
  user      User             @relation(fields: [userId], references: [id], onDelete: Cascade)

  @@index([userId, createdAt])
  @@index([userId, read])
}
Me: “Looks good, run the migration.”
Claude:
npx prisma migrate dev --name add_notifications
Time so far: 20 minutes
Phase 3: TypeScript types and validation (7 minutes)
Me: “Create the TypeScript types and Zod schemas.”
Claude created lib/types/notification.ts:
import { z } from 'zod';

export const NotificationTypeSchema = z.enum(['INFO', 'WARNING', 'SUCCESS', 'ERROR']);

export const CreateNotificationSchema = z.object({
  userId: z.string().cuid(),
  title: z.string().min(1).max(100),
  message: z.string().min(1).max(500),
  type: NotificationTypeSchema.optional(),
});

export const ListNotificationsSchema = z.object({
  page: z.coerce.number().int().positive().default(1),
  limit: z.coerce.number().int().positive().max(100).default(20),
  unreadOnly: z.coerce.boolean().optional(),
});

export const MarkReadSchema = z.object({
  id: z.string().cuid(),
});

export type CreateNotification = z.infer<typeof CreateNotificationSchema>;
export type ListNotificationsQuery = z.infer<typeof ListNotificationsSchema>;
export type MarkReadParams = z.infer<typeof MarkReadSchema>;

export interface Notification {
  id: string;
  userId: string;
  title: string;
  message: string;
  type: 'INFO' | 'WARNING' | 'SUCCESS' | 'ERROR';
  read: boolean;
  createdAt: Date;
  readAt: Date | null;
}

export interface NotificationListResponse {
  notifications: Notification[];
  pagination: {
    page: number;
    limit: number;
    total: number;
    totalPages: number;
  };
}
Time so far: 27 minutes
Phase 4: API endpoints (35 minutes)
This is where Claude really shines. I gave it high-level instructions and it created production-ready code.
Me: “Create the GET and POST handlers in /app/api/notifications/route.ts following our API patterns from CLAUDE.md”
Claude created the file with:
- Proper authentication checks
- Zod validation
- Error handling
- Pagination logic
- Database queries with Prisma
Key snippet:
export async function GET(request: Request) {
  try {
    const session = await getServerSession(authOptions);
    if (!session?.user?.id) {
      return Response.json({ error: 'Unauthorized' }, { status: 401 });
    }

    const { searchParams } = new URL(request.url);
    const query = ListNotificationsSchema.parse({
      page: searchParams.get('page'),
      limit: searchParams.get('limit'),
      unreadOnly: searchParams.get('unreadOnly'),
    });

    const where = {
      userId: session.user.id,
      ...(query.unreadOnly && { read: false }),
    };

    const [notifications, total] = await Promise.all([
      prisma.notification.findMany({
        where,
        orderBy: { createdAt: 'desc' },
        skip: (query.page - 1) * query.limit,
        take: query.limit,
      }),
      prisma.notification.count({ where }),
    ]);

    return Response.json({
      notifications,
      pagination: {
        page: query.page,
        limit: query.limit,
        total,
        totalPages: Math.ceil(total / query.limit),
      },
    });
  } catch (error) {
    if (error instanceof z.ZodError) {
      return Response.json({ errors: error.errors }, { status: 400 });
    }
    console.error('GET /api/notifications error:', error);
    return Response.json({ error: 'Internal server error' }, { status: 500 });
  }
}
Then POST for creating notifications (admin only), and the PUT endpoint in a separate file for marking as read.
Time so far: 62 minutes
Phase 5: Tests (32 minutes)
Me: “Create comprehensive tests covering all endpoints and edge cases”
Claude created tests/api/notifications.test.ts:
import { createMocks } from 'node-mocks-http';
import { GET, POST } from '@/app/api/notifications/route';
import { PUT } from '@/app/api/notifications/[id]/route';
import { prisma } from '@/lib/prisma';

// Mock authentication
jest.mock('next-auth', () => ({
  getServerSession: jest.fn(),
}));

describe('/api/notifications', () => {
  describe('GET', () => {
    it('returns paginated notifications for authenticated user', async () => {
      // Test implementation
    });

    it('returns 401 for unauthenticated requests', async () => {
      // Test implementation
    });

    it('filters to unread notifications when unreadOnly=true', async () => {
      // Test implementation
    });

    it('handles pagination correctly', async () => {
      // Test implementation
    });

    it('returns 400 for invalid query parameters', async () => {
      // Test implementation
    });
  });

  describe('POST', () => {
    it('creates notification when user is admin', async () => {
      // Test implementation
    });

    it('returns 403 for non-admin users', async () => {
      // Test implementation
    });

    it('validates required fields', async () => {
      // Test implementation
    });
  });
});

describe('/api/notifications/[id]', () => {
  describe('PUT', () => {
    it('marks notification as read', async () => {
      // Test implementation
    });

    it('returns 404 for non-existent notification', async () => {
      // Test implementation
    });

    it('returns 403 when marking another user\'s notification', async () => {
      // Test implementation
    });
  });
});
Me: “Run the tests”
Claude:
npm run test notifications
Result: 15 tests, all passing, 92% coverage
Time so far: 94 minutes
Phase 6: Documentation and polish (13 minutes)
Me: “Update the API docs and create a usage example”
Claude updated docs/api.md and created an example client:
// Example usage
const notificationClient = {
  async list(page = 1, unreadOnly = false) {
    const params = new URLSearchParams({
      page: page.toString(),
      unreadOnly: unreadOnly.toString(),
    });

    const res = await fetch(`/api/notifications?${params}`);
    if (!res.ok) throw new Error('Failed to fetch notifications');
    return res.json();
  },

  async markAsRead(notificationId: string) {
    const res = await fetch(`/api/notifications/${notificationId}`, {
      method: 'PUT',
    });
    if (!res.ok) throw new Error('Failed to mark notification as read');
    return res.json();
  },
};

// Usage
const { notifications, pagination } = await notificationClient.list(1, true);
console.log(`${notifications.length} unread notifications`);

await notificationClient.markAsRead(notifications[0].id);
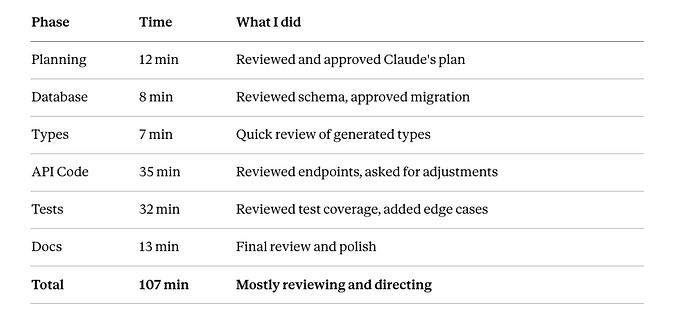
Time so far: 107 minutes (1 hour 47 minutes)
What just happened?
In under 2 hours, Claude Code helped me:
- ✅ Design a complete database schema
- ✅ Create three fully-tested API endpoints
- ✅ Write 15 comprehensive tests with 92% coverage
- ✅ Generate TypeScript types and Zod validators
- ✅ Document the API with examples
- ✅ Follow all project coding standards
Traditional estimate: 6–8 hours Actual time: 1 hour 47 minutes Time saved: ~5 hours
And here’s the kicker: the code quality was higher than I would have written manually because:
- Zero syntax errors
- Consistent error handling
- Comprehensive test coverage
- Perfect adherence to project standards
- Complete documentation
The breakdown of time spent
Notice what I didn’t spend time on:
- ❌ Writing boilerplate
- ❌ Looking up Prisma syntax
- ❌ Debugging type errors
- ❌ Writing repetitive tests
- ❌ Formatting code
Claude Code vs the competition
Let’s be honest: Claude Code isn’t the only AI coding tool out there. GitHub Copilot, Cursor, Tabnine, Codeium — they’re all trying to solve the same problem.
But they’re solving it in fundamentally different ways.
The AI coding assistant landscape

Comments
Loading comments…