How to Add Oauth Authentication to Your CustomGPT — A Step-by-Step Guide
Ever since the launch of GPTs by OpenAI, thousands of GPTs have been launched by GPT creators on a daily basis as can be seen in various GPT listings like here . But GPT creators have been stuck on few major issues while creating GPTs.
- Methods to limit access to a GPT and to monitor usage of a GPT.
- Strategies for monetizing a Custom GPT.
- How to collect user emails of subscribed users from a GPT.
In this blog article we shall discuss how we can achieve the above by adding an authentication layer on top of Custom GPT.

GPT-Auth
Setting up the entire authentication process from scratch is a lengthy process, if you want to skip doing it and want to use an existing open-source solution you can start from here https://github.com/Anil-matcha/GPT-Auth
Here is a demo video on the working of GPT Auth:
GPT Auth - Setting up authentication for your Custom GPT
If you are looking for a hosted version of the app instead of self-hosting, you can start from here https://gpt-auth.thesamur.ai/.
Steps to add authentication to a Custom GPT
Use an oauth2 server to handle oauth flow from a GPT. The server will provide the credentials of Client ID, Client Secret, Authorization URL, token url etc.
Enter the credentials obtained from above in your Custom GPT. Go to Configure section in your GPT and select your action. Go to edit action and click on edit oauth settings. Choose oauth2 and fill the above details
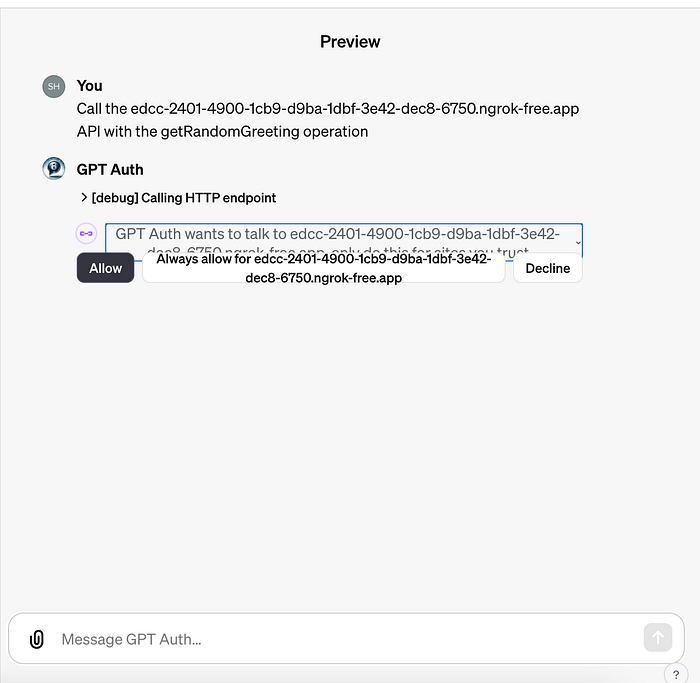
Authorization url endpoint is responsible for doing the auth flow for your app. Once you setup the above details, when you interact with an api, you will be provided with a permission screen like one below.
Once you allow you will be provided with an option to “Login to your app” . Click on login and you will be redirected to the login page of your app. Here you can configure an authentication method of your choice. A popular choice being google-auth. Here is a sample code in Flask to setup Google login for your app:
 @app.route("/login", methods=['GET'])
def login():
        code = query_params.get('code', [None])[0]
        redirect_uri = DOMAIN_URL + "/login"
        google = OAuth2Session(
            google_client_id, scope=GOOGLE_SCOPE, redirect_uri=redirect_uri)
        token_url = "https://www.googleapis.com/oauth2/v4/token"
        google.fetch_token(token_url, client_secret=getAdmin.google_client_secret,
                            code=code)
        response = google.get(
            'https://www.googleapis.com/oauth2/v1/userinfo').json()
        email = response["email"].lower()
        googleId = str(response["id"])
        name = response["name"]
        # login user here
Once the login is complete you must redirect the app back to ChatGPT based on the redirect url you received from ChatGPT. The redirect url is in the format below https://chat.openai.com/aip/plugin-THE-PLUGIN-ID-WILL-BE-HERE/oauth/callback?code=1234 . Code here is the same as the one you received from the ChatGPT request.
On redirect a verify token request will be sent to your server. You will need to identify the request and generate an access token for the request as outlined in the code below. This api is responsible for periodic refresh of tokens whenever your token expires
@app.route('/verify_token/<slug>', methods=['POST'])
def verify_token(slug):
    alphabet = string.ascii_letters + string.digits
    token = ''.join(secrets.choice(alphabet) for i in range(8))
    getUser = User.query.filter_by(admin_id=slug).order_by(User.id.desc()).first()
    getUser.token = token
    db.session.commit()
    return jsonify(access_token=token)
Once the token verification is completed, you will be displayed an authentication successful message. If your token verification fails, the entire auth fails and you need to again start from beginning
Now when a message in sent in chat to ChatGPT, your endpoint is invoked with the access token which you can verify to confirm the authenticity of the request. Below is a sample code on checking the authorization header for access token and restricting access to the api
@app.route('/get_greeting', methods=['GET'])
def get_greeting():
    token = request.headers['Authorization'].split(" ")[1]
    if User.query.filter_by(token=token).first()!=None:
        hello_list = ['Good morning','Good afternoon','How do you do?','What’s new?','Well, look who it is!','How have you been?','What’s up buttercup?','What’s up doc?','How are you?','What’s up','How are you going?','Yo, what’s up?','Where’ve you been?','Whassup?','Hey man','Hey dude','How are you guys?','Oi!','Mate!','Hey, what’s up','Cheers','You right?','How ya goin?','How are ya?','Howdy','What’s going on?','What do you know?','How’s this weather?']
        return random.choice(hello_list),200
    else:
        return "Invalid credentials",400
By following these steps in order, you should be able to add authentication to your GPT.
Common Issues
- Invalid details entered - Make sure the client id, secret, authorization url and token url are setup properly
- Domain not white-listed in Google console - If you are using Google for auth, make sure to white-list your domain
- Verify token api failure - Check the working of verify token api to make sure the authentication gets completed properly. Otherwise ChatGPT will throw an error on redirect from your app
- Domain mismatch - If your auth server domain and your api domain are mismatched it can cause an issue. Make sure to match them
Further steps
Once you add authentication to your GPT:
- You can monetize your GPT by keeping limits on usage per user on your api
- You can collect email address of all your users and create a newsletter to keep sharing your app updates or to upsell new features
- You can monitor usage of your api from the number of requests being sent
Thus adding authentication to a GPT opens up a ton of possibilites in monetization and building an audience. From my experience setting up auth in a GPT end-to-end requires a good amount of technical experience and thus I have shared from my experience how you can set it up much quicker.
Here is a GPT which you can use to test the above flow:
https://chat.openai.com/g/g-xx7FJpizE-gpt-auth
It's built on the code from this open-source project:
Comments
Loading comments…