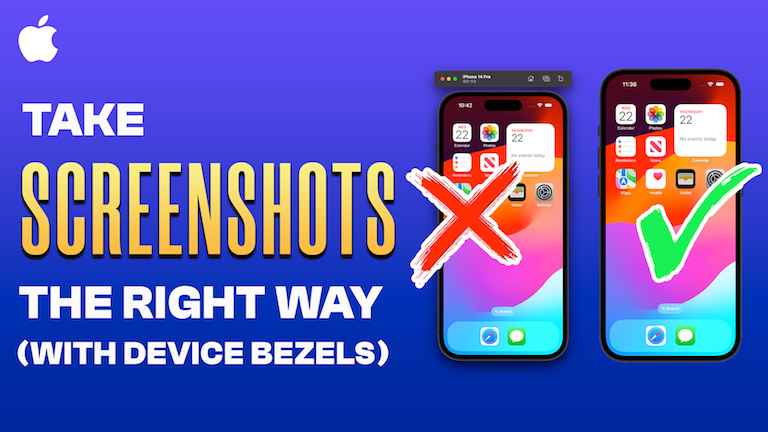
How to Take iOS Simulator Screenshots with Device Bezels & Without the Toolbar!
Before proceeding, please consider subscribing to my YouTube Channel
Originally posted on my website.
In this post we’ll learn how to generate screenshots of the iOS simulator with device bezels & without the toolbar. Watch the video or follow along with the steps detailed in the post.
Taking a regular screenshot of the simulator involves using the ⌘ + S key combination with the simulator active which saves the screenshot to the desktop or your preferred location. You could also use the simulator’s Trigger Screenshot option from the Device menu which saves the screenshot to the simulator’s internal Photos application. You could get this image by going to the ~/Library/Developer/CoreSimulator/Devices/<Simulator ID>/data/Media/DCIM/100APPLE path on your Mac. You get the simulator ID by running the xcrun simctl list devices command in Terminal & looking for (Booted) devices in the list that match the simulator. For most cases where you’d want to use or share screenshots, using either method is fine. However, if you want to capture screenshots with device bezels such as for presentations or YouTube thumbnails, neither of the two methods do that. In order to capture screenshots with device bezels, do the following:
- Press
⌘ + shift + 5to trigger the system screenshot option. - From the screenshot options, select
Capture Selected Window. Alternatively, you could keep the spacebar pressed to activate this option. - Mouse-over the simulator which’ll highlight it. You will see the mouse pointer change to a camera 📷 icon.
- Hold the
⌥ optionkey down and click to save the screenshot. Holding down⌥ optionwill save the screenshot without any shadows which is crucial for the next steps. - Open the saved screenshot in
Previewand select theMarkuptool. IfPreviewdid not launch with a wide enough window size, this option might be hidden within>>arrows in the navigation bar. - Select the
Rectangular Selectiontool in the markup toolbar, which will be the first option displayed as a dotted rectangle. - Ensure that the simulator is sufficiently visible & not sticking to the edges of the preview window in order to make a good selection. You could zoom out of the image using
⌘ + -or selectView > Zoom Outfrom the preview toolbar. - Make a rectangular selection around the screenshot, dont worry about going wide. As you make a selection, you will notice an animated marching ants effect which automatically highlights the selectable area of the screenshot.
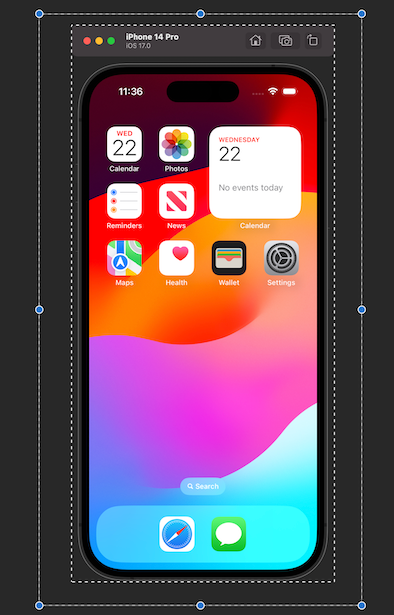
- Resize your selection using this animated guide. You will notice the selection lines snap to the marching ants borders on the left, right & bottom sides as you drag them. It is not necessary to snap your selection to these guides but you must make sure to drag the top portion of the selection using the circular blue handles to below the top bar but above the simulator bezels.
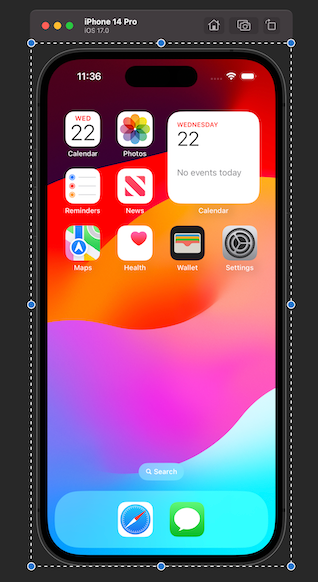
- Select the
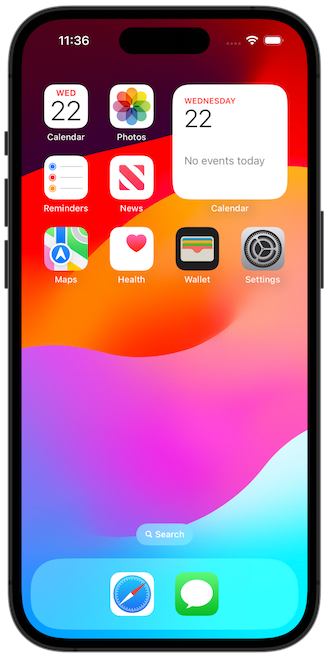
Croptool which will look like 2 interlocking right angles in the tool bar to crop the image to your selection. Press⌘ + Sto save this cropped selection.
And that’s it for this post. Consider subscribing to my YouTube channel & follow me on X(Twitter) for more such information. Leave a comment if you have any questions.
Share this article if you found it useful!
Also check out some of my other articles:
Comments
Loading comments…