
Custom logging in NestJs using winston
Logging and its importance
Logging is one of the most important parts of application development. Proper logging in a structured format can help us understand and debug the code. While we mostly focus on writing logic on the code, we should equally focus on logging most important events and actions in our code which would make our life easier when the code goes into production. In NestJS(a node.js based framework), things can get a bit tricky due to the way it handles multiple tasks at once. This can make debugging tough in certain situations. That’s where good logging comes in. It helps us make sense of how the code is running step by step, even in these complex scenarios.
Why use Custom Logger in NestJs
NestJs comes with a built-in text-based logger in the Logger class of @nestjs/common package. You can customize this default logger of the NestJs, but at a production level, you need to have specific logging formats including filtering, multiple destinations, and giving application-level insights.
Prerequisites
NestJs Framework understanding & Winston module for logging
Installation
npm i -g @nestjs/cli
nest new nest-logger
npm install --save nest-winston winston
npm install --save winston-daily-rotate-file
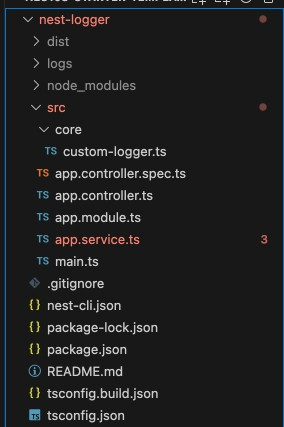
Code base structure
Creating a custom logging config service
Winston is one of the popular logging library in nodejs. See here for an article on Logging in nodejs.
Let's create a custom logging service file using Winston.
import * as winston from "winston";
import { DailyRotateFile } from "winston-daily-rotate-file";

export class Logging {
  dailyRotateFileTransport: any = null;
  myFormat: winston.Logform.Format = null;
  createLoggerConfig: winston.LoggerOptions = null;
  constructor() {
    /** A transport for winston which logs to a rotating file based on date**/
    this.dailyRotateFileTransport = new DailyRotateFile({
      filename: `logs/app_log-%DATE%.log`,
      zippedArchive: false,
      maxSize: "20m",
      maxFiles: "1d",
    });

    /**
     * Custom log format tailored to our application's requirements
     */
    this.myFormat = winston.format.printf(
      ({ level = "info", message, timestamp, req, err, ...metadata }) => {
        if (!req) {
          req = { headers: {} };
        }

        let msg = `${timestamp} [${level}] : ${message} `;
        const json: any = {
          timestamp,
          level,
          ...metadata,
          message,
          error: {},
        };

        if (err) {
          json.error = err.stack || err;
        }

        msg = JSON.stringify(json);
        return msg;
      }
    );

    this.createLoggerConfig = {
      level: "warn", // this will print warn and above level (error also)
      format: winston.format.combine(
        winston.format.colorize(),
        winston.format.splat(),
        winston.format.errors({ stack: true }),
        winston.format.json(),
        winston.format.timestamp({
          format: "YYYY-MM-DD HH:mm:ss",
        }),
        this.myFormat
      ),

      transports: [
        new winston.transports.Console({ level: "info" }),
        this.dailyRotateFileTransport,
      ],
    };
  }
}
Let's understand the code
- The
dailyRotateFileTransportproperty is initialized, creating a transport for the logger to rotate log files daily. Options likefilename,maxSize, andmaxFilescontrol how the rotation happens. - The
myFormatproperty defines a custom log format. It structures log messages using information liketimestamp,level,message, and other metadata. This format ensures the logs are easy to read and contain important details. Here you can add your application-specific keys too, such as certain request-headers,user-ids,etc which can help you easily trace and debug the logs on production. - The
createLoggerConfigproperty holds the logger's overall configuration. It specifies the log level, format, and transports. The logger will print logs of severity 'warn' and higher, merge all the custom log formats, and send logs to both the console and rotating files.
Using Custom Logging Config in main.ts
import { NestFactory } from "@nestjs/core";
import { AppModule } from "./app.module";
import { WinstonModule } from "nest-winston";
import { CustomLoggerService } from "./core/custom-logger";

async function bootstrap() {
  const customLoggerService = new CustomLoggerService();
  const app = await NestFactory.create(AppModule, {
    logger: WinstonModule.createLogger(customLoggerService.createLoggerConfig),
  });
  await app.listen(3000);
}
bootstrap();
The bootstrapping of a nestjs application starts at main.ts file. NestFactory.create(AppModule) creates a new NestJS application instance based on the configuration defined in the AppModule. While creating an instance of the app, we can pass the Logger configuration. The WinstonModule.createLogger() function creates a logger instance for your NestJS application using the configuration provided by customLoggerService.createLoggerConfig.
Testing the Custom Logger
Let's log different levels(info,warn,error) in our application service
In app.service.ts file
import { Injectable, Logger } from "@nestjs/common";

@Injectable()
export class AppService {
  private logger = new Logger(AppService.name); //will print this in context
  getHello(): string {
    this.logger.log({
      level: "warn",
      message: "This is warn level",
      refCode: "456789",
    });

    this.logger.log({
      level: "info",
      message: "This is Info level",
      refCode: "12355",
    });
    try {
      throw new Error("Some random error");
    } catch (err) {
      // pass err to print stack trace also
      this.logger.log({
        level: "error",
        message: "This is Error level",
        err: err,
        errCustomCode: "20",
      });
    }
    return "Hello World!";
  }
}
We have logged 3 different levels here.

Console Log output

app_log file (date based) (PS : info level is not printed here)
- Since we have passed
level:warnincreateLoggerConfig, info level logs won’t be written on log file there as it has lower precedence in log level
Log level Precedence is as below:
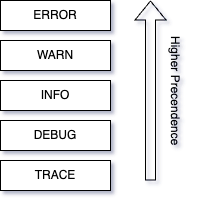
Log Level Precedence
If we pass level:info in createLoggerConfig, then only error, warn, and info levels would be written.
- The value in
contextwill be printed as what was provided when creating an instance of Logger(inapp.service.ts) . This aids us in comprehending and debugging within extensive log files, helping us identify which file authored the respective log entry.
Next Steps
Since we have now written the logs to a file, we can use fluentbit ( a lightweight log processor and forwarder) to pass these logs for further analysis and debugging. There are multiple plugins present in fluent-bit that can process and pass these data to multiple destinations like (elastic-search, AWS cloud watch,etc.)
Summary
Implementing a custom logger in NestJS is an essential practice to facilitate efficient debugging. Here we saw how to add a custom logger in NestJs at a production-level environment.
Sample Codebase:
Checkout my GitHub Link for code: https://github.com/manishbit97/nest-custom-logger
Comments
Loading comments…