The NextAuth.js is a 3rd party library designed to facilitate the implementation of login functionality on pages built using Next.js.
It provides relevant features to make the process of implementing login easier. For more detailed information, you can refer to next-auth introduction.
Why NextAuth?
The initial adoption of this library stemmed from its provision of a Provider, streamlining the implementation of login services based on the OAuth authentication protocol.
At the time of integrating the login feature, my team was in the midst of testing a web service, prompting the need for a rapid development approach. What particularly resonated with us was the ability to focus solely on the core login logic, thanks to the library’s user-friendly features.
The ability to easily manage and integrate social login functionalities like Google, Facebook, and Github was also a significant factor in using this library.
Of paramount importance in the realm of login functionality is security. To address this concern, the issuance of JSON Web Tokens (JWTs) for authentication, along with their secure storage within the browser post-login, was a critical necessity.
Let’s get started!
Installation
First, set up your Next.js project, and then proceed with installing the next-auth library.
npm create next-app next-auth-test
npm i next-auth

// or

yarn create next-app next-auth-test
yarn add next-auth
Setting up next-auth
Create an “auth” folder and a file named “route.ts” within “app/api/auth/[…nextauth]/route.ts” directory.
This code is from official next-auth website (https://next-auth.js.org/providers/credentials).
import  NextAuth  from  "next-auth/next";
import  CredentialsProvider  from  "next-auth/providers/credentials";

const handler = NextAuth({

providers: [
CredentialsProvider({
// The name to display on the sign in form (e.g. "Sign in with...")
name: "Credentials",
// `credentials` is used to generate a form on the sign in page.
// You can specify which fields should be submitted, by adding keys to the `credentials` object.
// e.g. domain, username, password, 2FA token, etc.
// You can pass any HTML attribute to the <input> tag through the object.
credentials: {
username: { label: "Username", type: "text", placeholder: "jsmith" },
password: { label: "Password", type: "password" }
},
async  authorize(credentials, req) {
// Add logic here to look up the user from the credentials supplied
const user = { id: "1", name: "J Smith", email: "jsmith@example.com" }

if (user) {
// Any object returned will be saved in `user` property of the JWT
return user
} else {
// If you return null then an error will be displayed advising the user to check their details.
return  null

// You can also Reject this callback with an Error thus the user will be sent to the error page with the error message as a query parameter
}
}
})
],


export { handler as  GET, handler as  POST };
And then write the .env file as follows:
NEXTAUTH_URL=http://localhost:3000
NEXTAUTH_SECRET=yoursecretcode
In previous versions of Next.js, placing the […nextauth].js file under the pages/api/auth directory was sufficient for functionality.
However, with Next.js version 13, following the updated App Router structure, you should create a route.js file under the app/api/auth/[…nextauth] directory if you working with APIs like NextAuth.
If you’re using TypeScript, you can utilize the .ts extension.
Upon closer inspection, you might notice a distinctive export syntax employed at the end. This syntax is part of the ES6 module export feature, introducing a fresh approach to designate the exported module’s name using the ‘as’ keyword. This approach serves a pivotal role in facilitating the execution of handler functions via either the GET or POST methods.
This importance stems from Next.js 13’s strong recommendation to export modules using the GET and POST methods. By exporting the handler object as illustrated above, you unlock the capability to import it in a manner that aligns precisely with your intended use.
This empowers you to seamlessly tailor your import approach to either GET or POST, adhering harmoniously to Next.js 13’s directive to emphasize GET and POST methods for exports.
Within the “providers” section, you have the flexibility to incorporate various options. In the provided code, we’ve chosen to use the CredentialsProvider. This provider comprises several key components.
To start, there’s the “name” section, followed by the “credentials” section. This “credentials” part directly corresponds to the content within the login form.
Lastly, we encounter an asynchronous function known as “authorize”. Within this function, a thorough validation of the email and password elements takes place. If the validation proves successful, the function returns a user object. Conversely, if the validation fails, it returns null.
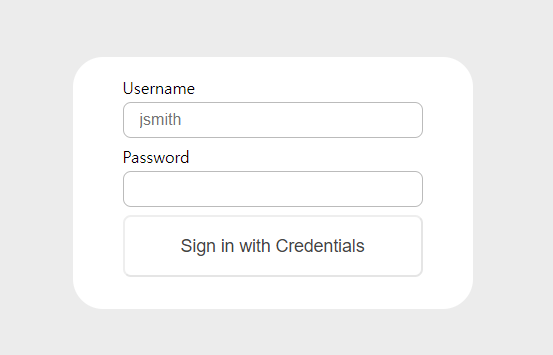
NextAuth provides a built-in login form, and when you navigate to the “/api/auth/signin” URL, you’ll encounter a login form like below.
When a login is successful, the user’s details are stored within the session. To use this information, we need to envelop the component with the SessionProvider.
So, in the layout.ts file, encase the children element with the SessionProvider, like this:
export default function RootLayout({
  children,
}: {
  children: React.ReactNode,
}) {
  return (
    <html lang="en">
      <body className={inter.className}>
        <SessionProvider>{children}</SessionProvider>
      </body>
    </html>
  );
}
page.tsx
export default function Home() {
  const { data: session } = useSession();

  if (session && session.user) {
    console.log("session.user", session?.user);
    return (
      <button onClick={() => signOut()}>{session.user.name} Sign Out</button>
    );
  }

  return <button onClick={() => signIn()}>SignIn</button>;
}
Now, when there’s an active session after a successful login, display the logout button. Conversely, when no session exists, show the login button.
That’s it!
And if you intend to show your own custom signin page, simply add the pages code in the route.ts file like below:
const handler = NextAuth({
pages: {
signIn: "/auth/signin",
},

providers: [
CredentialsProvider({
name: "Credentials",
credentials: {
...
If you intend to restrict access to specific pages only for logged-in users, you can achieve this by adding middleware.ts file as below.
export { default } from "next-auth/middleware";

export const config = {
  matcher: ["/home", "/user/:path*"],
};
Also, If you’re concerned about security, you can also include a token in the session object. However, when working with TypeScript, you’ll need to define the session type.
You can achieve this by creating a file named “next-auth.d.ts,” as shown below. In my case, I included a User object within the session, containing information such as accessToken, refreshToken, and accessTokenExpires.
import  "next-auth";

declare  module  "next-auth" {
interface  User {
id: number;
email: string;
name: string;
role: string;
accessToken: string;
refreshToken: string;
accessTokenExpires: number;
}

interface  Session  extends  DefaultSession {
user: User;
expires: string;
error: string;
}
}
export  const  authOptions: NextAuthOptions = {
providers: [
...
],
callbacks: {
async  jwt({ token, user, session }) {
// the processing of JWT occurs before handling sessions.
console.log("jwt callback ", { token, user, session });

if (user) {
token.accessToken = user.accessToken;
token.refreshToken = user.refreshToken;
token.accessTokenExpires = user.accessTokenExpires;
token.role = user.role;
token.id = user.id;
}

return token;
},

// The session receives the token from JWT
async  session({ session, token, user }) {
console.log("session callback ", { token, user, session });

return {
...session,
user: {
...session.user,
accessToken: token.accessToken  as  string,
refreshToken: token.refreshToken  as  string,
role: token.role,
id: token.id,
},
error: token.error,
};
},
},

...

};
Once the providers are executed, the callback is subsequently triggered. This callback function is called whenever the page is refreshed.
Concluding our exploration, we’ve delved into the straightforward implementation of social login using next-auth. Beyond just configuring providers, this library offers a wealth of capabilities, from integrating with databases for user data storage to configuring settings related to login success and more. The versatility it brings makes it an indispensable tool.
With its user-friendly design, next-auth simplifies the process of integrating social login within Next.js projects. It’s a recommendation worth considering for those seeking to swiftly implement authentication features while focusing on other development aspects.
For those desiring more comprehensive information, I recommend exploring the official website for additional resources.
Comments
Loading comments…