
User authentication is something you must manage in web applications. And with modern security risks, it has been stated time and time again that using local storage to store jwt’s and API keys is a security risk due to XSS(Content site scripting). A brief summary of this security risk is that any third party js injected into your site can just run a simple document.cookie script and get all the important data in local storage and exploit it.
For more info on this security risk:
Please Stop Using Local Storage
So what’s the alternative to local storage, As my giveaway from the title is. cookies! JavaScript cannot access http-only cookies. The server sends these cookies along with its response, the browser stores it and sends it along with the request.
So how can we make use of this as frontend engineers. if your backend can switch to cookie auth, Perfect. But sometimes the backend is building APIs for multiple clients that don’t support cookies or your frontend is communicating with public API’s you don’t have control over.
Luckily for us, Next.js is a server rendered framework by default so we can create a proxy server using api routes to handle the getting/setting of cookies.
P.S. Since we will be using server actions, this tutorial will work for Next.js 13+ and App router
Server actions are experimental in Next 13 so to opt in, edit your next config like so:
/** @type {import('next').NextConfig} */
const nextConfig = {
    experimental: {
        serverActions: true,
    },
}

module.exports = nextConfig
1. Storing tokens after login
First off we create a server action to store the token.
A server action is nextjs way of performing a server mutation. It is essentially an async function that performs an action on the server.
P.S it does not return a value, it just performs the action and resolves
This is how a server action for setting the http-only cookie looks like:
"use server"

import { cookies } from "next/headers"

interface StoreTokenRequest {
    token: string
    refresh_token: string
}

export async function storeToken(request: StoreTokenRequest) {
    cookies().set({
        name: "accessToken",
        value: request.token,
        httpOnly: true,
        sameSite: "strict",
        secure: true,
    })

    cookies().set({
        name: "refreshToken",
        value: request.refresh_token,
        httpOnly: true,
        sameSite: "strict",
        secure: true,
    })
}
Let me break down what the code does:
"use server"instructs the next compiler to run this code on the server. It should be put at the top of the actions file. Personally I create anactions.tsfile with all the server actions my app has.- we import the cookies function from
next/headers, it provides a convenient way of interacting with cookies on the server. link to docs here httpOnly: trueprevents javascript from accessing cookies using thedocument.cookieAPIsameSite: "strict"cookies are only sent in a first-party context (i.e., when the site in the URL bar matches the domain of the cookie.secure: trueensures that the cookie is only sent over secure, encrypted connections (HTTPS). but since most testing environments are on localhost, it is allowed
Then executing this action looks like:
import { storeToken } from "@/lib/actions";

async function onSubmit(formData) {
    setIsLoading(true);
    try {
      const resp = await http.post(`/auth/login`, formData);

      await storeToken(resp.data);

      router.push("/dashboard");

      toast({
        title: "Login Successful",
      });
    } catch (error) {
      console.error("error logging in", error);
    } finally {
      setIsLoading(false);
    }
  }
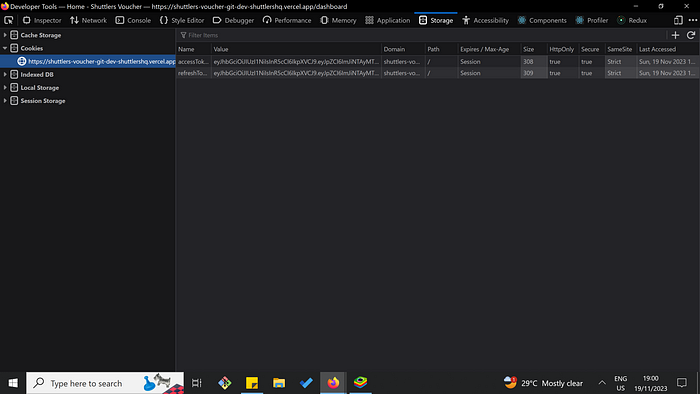
After testing this check your cookie storage in devtools and the token should be set:
Now let’s move on to using the token to communicate with our API.
2. Accessing the Token
So accessing the token is different depending on the context. If you are accessing it on the server it looks like:
import {cookies} from "next/headers";

const authToken = cookies().get("accessToken")?.value
In the Client side, because we set httpOnly: true . How do we now access our jwt? That’s where creating an api route comes in. It would have been really cool to have a server action for retrieving the token but we don’t have that yet. “fix up Next.js team”!
Docs for api routes using the app router here.
So the gist is a folder structure of app/api/auth/token/route.ts resolves to an endpoint with path of /api/auth/token . Now in the route.ts file we write:
import { cookies } from 'next/headers'

export async function GET(request: Request) {
    const authToken = cookies().get('accessToken')?.value
    const headers = new Headers();
    headers.append("Authorization", authToken);

    const response = await fetch(`${process.env.NEXT_PUBLIC_API_URL}/user`,{
      headers: headers
    }
    if (response.status === 401) {
      const refreshPayload = {
        "refresh_token": cookies().get('refreshToken')?.value
      }
      const res = await fetch(`${process.env.NEXT_PUBLIC_API_URL}/refresh-token, {
        method: "POST",
        headers: {
          "Content-Type": "application/json",
        },
         body: JSON.stringify(refreshPayload),
      }

      const jsonData = await res.json()

      cookies().set({
        name: "accessToken",
        value: jsonData.token,
        httpOnly: true,
        sameSite: "strict",
        secure: true,
      })

      cookies().set({
          name: "refreshToken",
          value: jsonData.refresh_token,
          httpOnly: true,
          sameSite: "strict",
          secure: true,
      })
    }
    const resData = {
        token: cookies().get('accessToken')?.value
    }


    return new Response(JSON.stringify(resData), {
        status: 200,
        headers: {
            'Content-Type': 'application/json',
        },
    })
}
Now let’s break down what this api route does:
- we retrieve the jwt from the cookie store
- we make a request to /user on our api to check if the token is still valid. /user can be replaced with any protected route on your api
- if we receive the
unauthorized(401)error code we send a request to get a new token pair with our refresh token. - then we return the valid token back to the client for use.
Now, to make use of this API route we can write an axios interceptor like so:
axiosInstance.interceptors.request.use(async (config) => {
        if (config.url?.includes("auth")) {
            return config
        }

        const res = await fetch('/api/auth/token')
        const resData = await res.json()
        const token = resData?.token

        config.headers!['Authorization'] = "Bearer " + token
         return config
    },
    (error) => {
        return Promise.reject(error)
    }
)
What this interceptor does is: “if the app is making a request to an auth route like /auth/login , /auth/signup no token is sent along with the request but if it is to a protected route it fetches the access token from our api route and passes it in the Authorization header.
Further reading:
This article was greatly inspired by:
Next.js Secure Authentication Using http-only Cookie (GraphQL or REST)
If you want to see how to do this with GraphQL or you are working on older versions of Next.js without server actions, I suggest the article.
Thanks for reading and if you have any questions, drop them in the comments.
Happy building!🚀
Comments
Loading comments…