
If you’ve ever watched a test suite crawl through 400 browser tests for 25 minutes, wept at Selenium’s flakiness, or wrestled with Cypress’s single-tab limitation, welcome! You’re exactly who Playwright was built for.
The Complete Series: 8 Weeks to Playwright Mastery
Before we dive in, here’s the full roadmap for this series. Each week builds on the last, taking you from first install to production-grade test architecture.

Bookmark this. Each week I’ll publish the next chapter. Now, let’s start at the beginning.
What Exactly Is Playwright?
Playwright is an open-source browser automation framework developed by Microsoft, released in 2020. It lets you write code that controls real browsers , Chromium, Firefox, and WebKit, to simulate everything a real user can do: clicking, typing, navigating, taking screenshots, intercepting network traffic, and more.
But Playwright isn’t just another Selenium wrapper. It was built from scratch with a fundamentally different architecture, solving the deep structural problems that have plagued browser testing for years.
“Playwright enables reliable end-to-end testing for modern web apps. It’s fast, auto-waits for elements, and runs tests across all major browser engines.”**- Microsoft Playwright Team
The Architecture: How Playwright Actually Works
Unlike older tools that relied on WebDriver (a standardized-but-slow HTTP protocol), Playwright communicates with browsers over the Chrome DevTools Protocol (CDP) and its Firefox/WebKit equivalents directly. This direct channel is what gives it its speed and reliability superpowers.
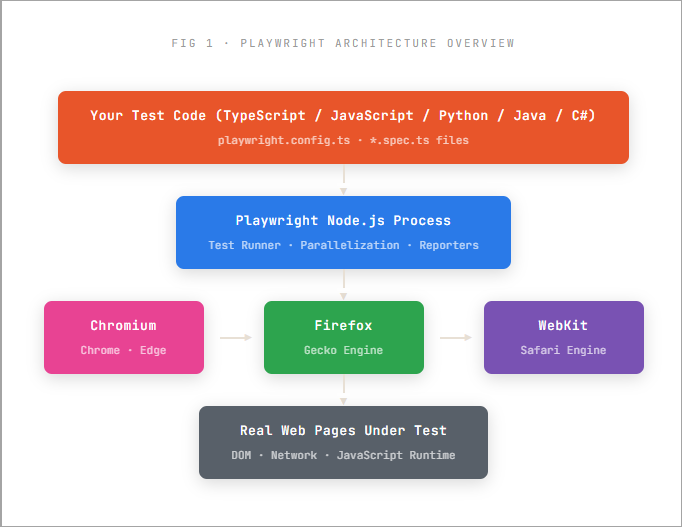
This direct browser communication means Playwright can:
- Intercept and modify network requests before they leave the browser
- Listen to browser events like console logs, page errors, file downloads
- Control multiple browser contexts (think: multiple logged-in users simultaneously)
- Run in fully headless mode with near-zero overhead
Why Playwright? (And Not Cypress or Selenium?)
The testing ecosystem is crowded. If you’ve worked in web development for more than a year, you’ve probably encountered Selenium, Cypress, or Puppeteer. So why should Playwright be your tool of choice in 2025/26?
The Head-to-Head Comparison
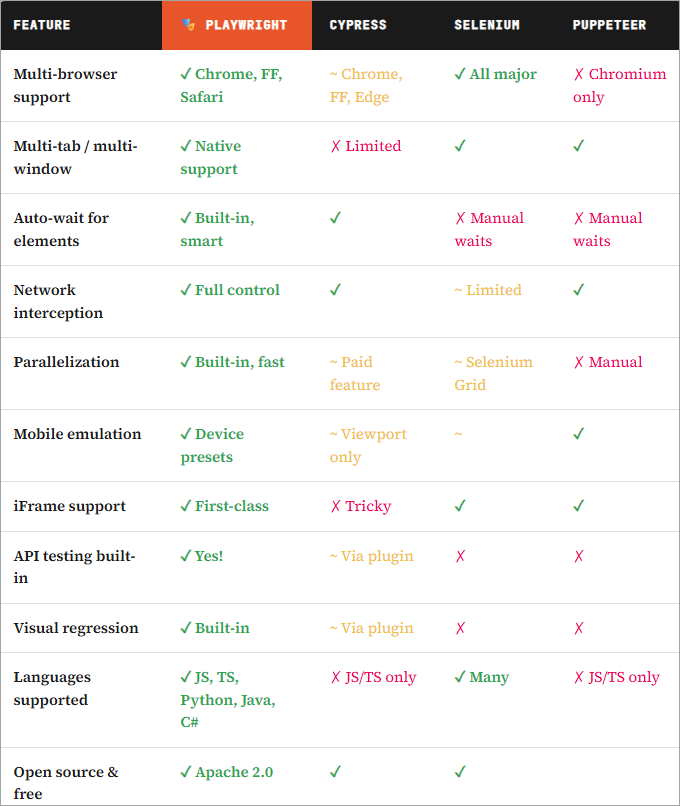
💡The Bottom Line: If you’re starting a new project in 2026 and need robust, cross-browser, parallel testing with zero compromises, Playwright is the clear choice. It’s what the Microsoft Edge team and many Fortune 500 companies use in production.
The 5 Killer Features That Set Playwright Apart
1. Auto-waiting is genuinely smart. Playwright doesn’t just poll the DOM hoping an element shows up. It understands element actionability , an element must be visible, stable, not obscured, and enabled before Playwright acts on it. No more await page.waitForTimeout(2000) hacks.
2. Browser contexts are blazingly fast. Each Playwright browser context is a fresh, isolated session (like an incognito window) but shares the browser process. This means you can spin up 50 isolated test contexts in seconds without launching 50 browser instances.
3. The Trace Viewer is a game-changer for debugging. When tests fail in CI, Playwright records a zip of every action, screenshot, network request, and console log. You open it in a browser and replay the test failure like watching a video, with a DOM snapshot at every step.
4. Native mobile emulation. Playwright ships with device descriptors for 50+ devices (iPhone, Pixel, iPad, etc.) including correct viewport, user-agent, touch events, and device pixel ratio. No extra configuration needed.
5. It treats iFrames as first-class citizens. If you’ve ever cried while writing Selenium code to deal with iframes, Playwright’s frameLocator() will make you smile.
Installation: Zero to Running in Under 10 Minutes
Playwright officially supports Node.js (JavaScript/TypeScript), Python, Java, and .NET. We’ll use TypeScript throughout this series ; it’s the most popular choice and gives you excellent autocomplete and type safety.
⚠️Prerequisites Make sure you have Node.js 18+ installed. Check with
node --version. If you don't have it, grab it from nodejs.org.
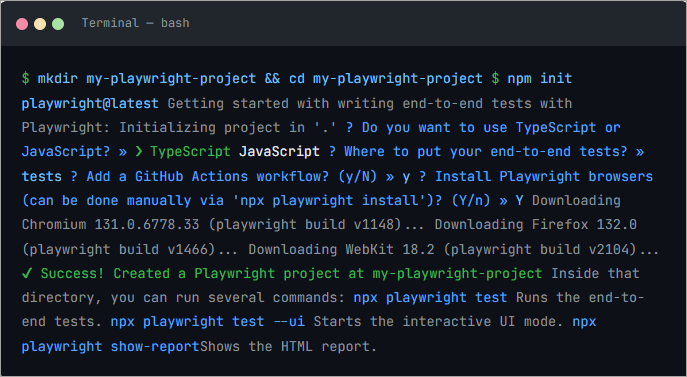
Create a new project directory
Start fresh with a dedicated folder for your Playwright tests.
Run the Playwright init command
Playwright’s CLI wizard sets everything up: config, example tests, GitHub Actions config, and browser downloads.
Install browsers
Playwright downloads its own versions of Chromium, Firefox, and WebKit so your tests are always reproducible.
Run the example tests
Verify everything works by running the bundled example tests against playwright.dev itself.
Here’s the full installation sequence in your terminal:
ℹ️ Behind the Scenes The
npm init playwright@latestcommand installs the@playwright/testpackage, creates aplaywright.config.tsconfig file, adds example tests intests/, and optionally sets up GitHub Actions CI. It's a one-liner that does the work of an afternoon.
Understanding Your Project Structure
After running the init command, here’s what your project looks like:
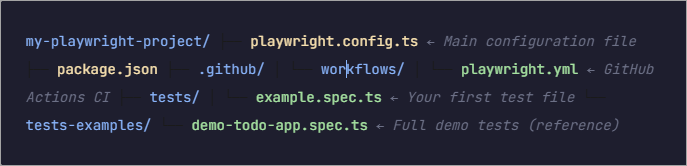
The Config File: playwright.config.ts
The config file is the heart of your Playwright setup. Let’s look at what it generates for you and understand each part:
import { defineConfig, devices } from '@playwright/test';

export default defineConfig({
// Directory where test files live
testDir: './tests',

// Run tests in parallel (each file runs in its own worker)
fullyParallel: true,

// Fail CI if you accidentally left test.only() in your code
forbidOnly: !!process.env.CI,

// Retry failed tests twice in CI, zero locally
retries: process.env.CI ? 2 : 0,

// Number of parallel workers
workers: process.env.CI ? 1 : undefined,

// The reporter to use
reporter: 'html',

// Default settings shared across all tests
use: {
  // Base URL for all page.goto('/some-path') calls
  baseURL: 'http://localhost:3000',

  // Capture trace on first retry (great for debugging CI failures)
  trace: 'on-first-retry',
},

// Run tests across 3 browser engines
projects: [
  { name: 'chromium', use: { …devices['Desktop Chrome'] } },
  { name: 'firefox', use: { …devices['Desktop Firefox'] } },
  { name: 'webkit', use: { …devices['Desktop Safari'] } },

  // Mobile emulation out of the box!
  { name: 'Mobile Chrome', use: { …devices['Pixel 5'] } },
  { name: 'Mobile Safari', use: { …devices['iPhone 13'] } },
 ],

  // Spin up your dev server before tests
  // webServer: {
  // command: 'npm run start',
  // url: 'http://localhost:3000',
  // reuseExistingServer: !process.env.CI,
  //
});
Writing Your First Test
Now the fun part. Let’s write a real test: not just a “hello world” toy, but something that demonstrates the key Playwright concepts you’ll use every day.
We’ll test a simple todo application. Create a new file: tests/todo.spec.ts
import { test, expect } from '@playwright/test';

// The URL we're testing against
const TODO_APP = 'https://demo.playwright.dev/todomvc';

// test() is Playwright's equivalent of it() in Jest
test('should add a new todo item', async ({ page }) => {
  // Navigate to the app
  await page.goto(TODO_APP);

  // Find the input and type a new todo
  await page.getByPlaceholder('What needs to be done?').fill('Buy groceries');

  // Press Enter to submit
  await page.getByPlaceholder('What needs to be done?').press('Enter');

  // Assert the item appears in the list
  await expect(page.getByText('Buy groceries')).toBeVisible();
});

test('should mark a todo item as complete', async ({ page }) => {
  await page.goto(TODO_APP);

  // Add a todo first
  const input = page.getByPlaceholder('What needs to be done?');
  await input.fill('Write Playwright tests');
  await input.press('Enter');

  // Click the circle checkbox to mark it done
  await page.getByRole('checkbox', { name: 'Write Playwright tests' }
    ).check();

  // Verify the item is now marked as completed
  await expect(
    page.getByTestId('todo-item').filter({
      hasText: 'Write Playwright tests'
    })
  ).toHaveClass(/completed/);
});

// Group related tests with test.describe()
test.describe('Filtering todos', () => {

  // beforeEach runs before every test in this describe block
  test.beforeEach(async ({ page }) => {
    await page.goto(TODO_APP);

    // Seed the list with 3 items
    const input = page.getByPlaceholder('What needs to be done?');
    for (const todo of ['Buy milk', 'Walk dog', 'Read book']) {
      await input.fill(todo);
      await input.press('Enter');
    }

    // Complete the first todo
    await page.getByRole('checkbox', { name: 'Buy milk' }).check();
  });

  test('shows only active todos on "Active" filter', async ({ page }) => {
    await page.getByRole('link', { name: 'Active' }).click();

    const items = page.getByTestId('todo-item');
    await expect(items).toHaveCount(2);
    await expect(items).not.toContainText('Buy milk');
  });

  test('shows only completed todos on "Completed" filter', async ({ page }) => {
    await page.getByRole('link', { name: 'Completed' }).click();

    const items = page.getByTestId('todo-item');
    await expect(items).toHaveCount(1);
    await expect(items.first()).toHaveText('Buy milk');
  });

});
Let’s Break This Down
There are several Playwright idioms worth noting in this test file:
async ({ page }) => {}
Every Playwright test receives a fixture object. The page fixture is a new browser page (tab) that's automatically created and torn down for each test. No setup/teardown boilerplate needed.
getByPlaceholder(), getByRole(), getByText()
These are Playwright's semantic locators. They find elements the way a user would describe them, making tests far more readable and resilient to UI refactors. We'll explore these deeply in Week 2.
expect(...).toBeVisible()
Playwright's assertions are auto-retrying. This doesn't just check once and fail - it retries for up to 5 seconds (configurable) until the assertion passes or times out. This eliminates most flaky test issues.
Running Your Tests
You have three ways to run Playwright tests, each serving a different purpose:
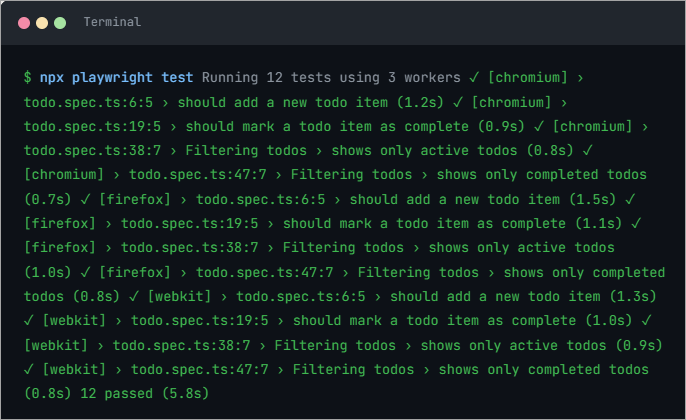
1. The Command Line (Headless - for CI)
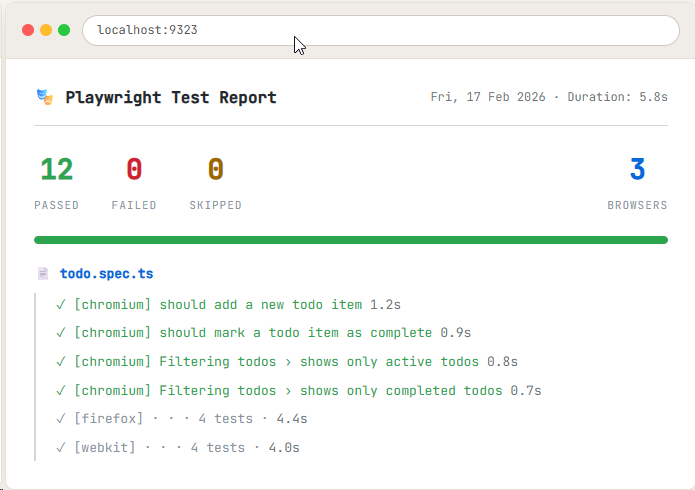
2. The HTML Report (Beautiful Pass/Fail Summary)
After running tests, open the generated HTML report with:

3. The UI Mode (Interactive Dev Experience ✨)
This is where Playwright really shines for development. The UI Mode gives you a live, hot-reloading test runner with a visual timeline of every action:


🏃Pro Tip: Run a Single Test File During development, you don’t want to run all 200 tests. Use
npx playwright test todo.spec.tsto run just one file, ornpx playwright test --grep "add a new"to run tests matching a string.
Key Concepts You Learned This Week
Let’s recap the foundational concepts introduced in this article before we move on:
Playwright is not just another test runner; it’s a complete browser automation platform with built-in parallelism, tracing, network interception, and visual testing. It communicates directly with browsers via CDP rather than through the slow WebDriver protocol, which is why it’s so fast. Each test gets a fresh browser context automatically, ensuring test isolation without the overhead of launching a new browser. Auto-waiting is baked into every action and assertion, eliminating most of the flakiness that plagues other tools. And it runs tests across three browser engines (Chromium, Firefox, WebKit) from a single test file.
📚 Homework Before Week 2 Install Playwright on your machine, run the example tests with
npx playwright test, then open the HTML report withnpx playwright show-report. Take a look at the trace viewer by runningnpx playwright test --trace on. Next week, we go deep on locators - the most important skill in Playwright.
Comments
Loading comments…