In this article, we will be taking a look at how to create a Dropdown Menu in SwiftUI in 3 (or actually 3.5) different approaches.
We will first be covering the easy fussy ways of using the SwiftUI built in struct Picker and Menu. We will then be diving into creating our Custom Dropdown Menu from scratch to achieve something like below.
Picker
Let’s get started with the most basic Picker.
import SwiftUI

struct DropDownMenu: View {
    var friuts = ["apple", "banana", "orange", "kiwi"]
    @State private var selectedFruit: String = "banana"

    var body: some View {
        VStack {
            Picker("fruits", selection: $selectedFruit) {
                ForEach(friuts, id: \.self) { fruit in
                    Text(fruit)
                }
            }
        }
        .frame(maxWidth: .infinity, maxHeight: .infinity, alignment: .center)
        .background(Color(UIColor.lightGray).opacity(0.4))

    }
}

Don’t like the up-and-down chevron? Don’t like the color? Want to add some custom styles? Change the background color of the selected value is pretty much all you can do… You cannot change the foreground of it, and no customizations allowed at all for the selections.
Try to add some background and foreground Style if you don’t believe me!
Picker("fruits", selection: $selectedFruit) {
    ForEach(friuts, id: \.self) { fruit in
        Text(fruit)
            .foregroundStyle(Color.white)
            .background(RoundedRectangle(cornerRadius: 16).fill(Color.black))
    }
}
.foregroundStyle(Color.white)
.background(RoundedRectangle(cornerRadius: 16).fill(Color.black))
And here is all we got…
Menu
This is another built-in option for showing popup menus from buttons.
Basic Menu
import SwiftUI

struct DropDownMenu: View {
    var friuts = ["apple", "banana", "orange", "kiwi"]
    @State private var selectedFruit: String = "banana"

    var body: some View {
        VStack {
            Menu(selectedFruit) {
                ForEach(friuts, id: \.self) { fruit in
                    Button(fruit, action: {
                        selectedFruit = fruit
                    })
                }
            }

        }
        .frame(maxWidth: .infinity, maxHeight: .infinity, alignment: .center)
        .background(Color(UIColor.lightGray).opacity(0.4))

    }
}

Trying to add some custom styles
Menu(selectedFruit) {
    ForEach(friuts, id: \.self) { fruit in
        Button(action: {
            selectedFruit = fruit
        }, label: {
            Text(fruit)
                .foregroundStyle(Color.white)
                .background(RoundedRectangle(cornerRadius: 16).fill(Color.black))
        })
    }
}
.padding(.all, 16)
.foregroundStyle(Color.white)
.background(RoundedRectangle(cornerRadius: 16).fill(Color.black))
Okay, we are still not able to customize the selection menu, but at least we get the choose the style of the selected item including adding some custom images.
Nested Menu
We can also place menus inside menus, which will cause iOS to reveal the second menu when the first option is tapped.
For example we can add an option in our Base Menu to show moreFruits.
struct DropDownMenu: View {
var friuts = ["apple", "banana", "orange", "kiwi"]
var moreFruits = ["watermelon", "stawberry"]
@State private  var selectedFruit: String = "banana"

var body: some View {
VStack {
Menu(content: {
ForEach(friuts, id: \.self) { fruit in
Button(action: {
selectedFruit = fruit
}, label: {
Text(fruit)
})
}

Menu(content: {
ForEach(moreFruits, id: \.self) { moreFruit in
Button(action: {
selectedFruit = moreFruit
}, label: {
Text(moreFruit)
})
}
}, label: {
Text("More Fruits")
})

}, label: {
(Text("\(selectedFruit) ") + Text(Image(systemName: "chevron.up")))
})
.padding(.all, 16)
.foregroundStyle(Color.white)
.background(RoundedRectangle(cornerRadius: 16).fill(Color.black))

}
.frame(maxWidth: .infinity, maxHeight: .infinity, alignment: .center)
.background(Color(UIColor.lightGray).opacity(0.4))

}
}
Combination Of Menu and Picker
Before we move onto creating a Custom Dropdown from scratch, there is actually a 2.5th option of combining Menu and Picker.
When you might want this? The default Menu almost meet what you need but you want the check mark in front of the chosen value on the selection menu.
struct DropDownMenu: View {
var friuts = ["apple", "banana", "orange", "kiwi"]
@State private  var selectedFruit: String = "banana"

var body: some View {
VStack {
Menu(content: {
Picker("fruits", selection: $selectedFruit) {
ForEach(friuts, id: \.self) { fruit in
Text(fruit)
}
}
}, label: {
(Text("\(selectedFruit) ") + Text(Image(systemName: "chevron.up")))
})
.padding(.all, 16)
.foregroundStyle(Color.white)
.background(RoundedRectangle(cornerRadius: 16).fill(Color.black))

}
.frame(maxWidth: .infinity, maxHeight: .infinity, alignment: .center)
.background(Color(UIColor.lightGray).opacity(0.4))

}
}

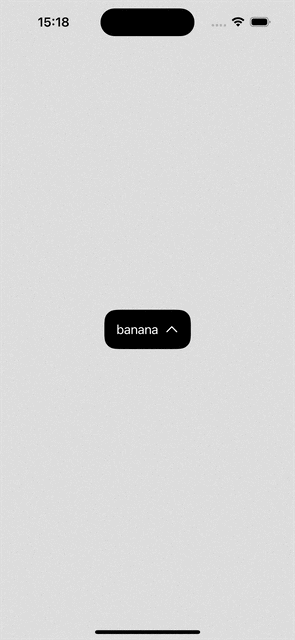
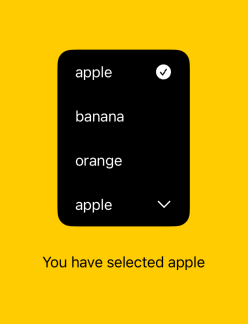
Custom DropDown
Above options do not meet what I want so I decided to make my own!
The idea itself is fairly straight forward. We have a Button to show our selection menu, and since we want the menu to be on top of other contents, it should have a large z-index. However, it requires some work to achieve the exact behavior we are looking for.
Let me share with you the code really quick and explain what I have done here.
struct  DropDownMenu: View {

let options: [String]

var menuWdith: CGFloat  =  150
var buttonHeight: CGFloat  =  50
var maxItemDisplayed: Int  =  3

@Binding  var selectedOptionIndex: Int
@Binding  var showDropdown: Bool

@State  private  var scrollPosition: Int?

var body: some  View {
VStack {

VStack(spacing: 0) {
// selected item
Button(action: {
withAnimation {
showDropdown.toggle()
}
}, label: {
HStack(spacing: nil) {
Text(options[selectedOptionIndex])
Spacer()
Image(systemName: "chevron.down")
.rotationEffect(.degrees((showDropdown ?  -180 : 0)))
}
})
.padding(.horizontal, 20)
.frame(width: menuWdith, height: buttonHeight, alignment: .leading)


// selection menu
if (showDropdown) {
let scrollViewHeight: CGFloat  = options.count > maxItemDisplayed ? (buttonHeight*CGFloat(maxItemDisplayed)) : (buttonHeight*CGFloat(options.count))
ScrollView {
LazyVStack(spacing: 0) {
ForEach(0..<options.count, id: \.self) { index in
Button(action: {
withAnimation {
selectedOptionIndex = index
showDropdown.toggle()
}

}, label: {
HStack {
Text(options[index])
Spacer()
if (index == selectedOptionIndex) {
Image(systemName: "checkmark.circle.fill")

}
}

})
.padding(.horizontal, 20)
.frame(width: menuWdith, height: buttonHeight, alignment: .leading)

}
}
.scrollTargetLayout()
}
.scrollPosition(id: $scrollPosition)
.scrollDisabled(options.count <=  3)
.frame(height: scrollViewHeight)
.onAppear {
scrollPosition = selectedOptionIndex
}

}

}
.foregroundStyle(Color.white)
.background(RoundedRectangle(cornerRadius: 16).fill(Color.black))

}
.frame(width: menuWdith, height: buttonHeight, alignment: .top)
.zIndex(100)

}
}
First thing you might be wondering when you see the code: why the hell do we have to have a VStack within VStack?
The outside VStack is to ensure that even with the selection menu displaying, our DropDownMenu View should not (and will not) take more height than what we have assigned to the buttonHeight! Also the z-index has to be place here in order for everything to show up above other contents we may have!
The inside VStack is to make sure that the background and foreground style remains the same in a continuous way when we expand and collapse the selection menu.
If you remove the VStack and add the background and foreground styles to each individual View inside. You will notice a round corner between your selected item and the menu. If this is the effect you want, you may consider moving this inside.

Since we don’t know how many options we end up having, we have a limit maxItemDisplayed and if the option count go beyond this, our selection menu will become scrollable. Also, every time we open it up, it should scroll to and show the selected option.
Another thing you might be wondering is why do we keep repeating adding
.padding(.horizontal, 20)
.frame(width: menuWdith, height: buttonHeight, alignment: .leading)
for each of the individual child view instead of adding it to the VStack directly surrounding it. They are all necessary! You can confirm it by commenting it out and see how the behavior changes.
For example, if the padding is on the VStack, you will see your Image showing up outside the black background. This is because I have a Spacer within my HStack to help positioning the chevron to the most right, and in order for this to work, the padding has to be directly applied to the HStack.
In you want your items and selection button to be center aligned instead, simple change alignment: .leading to alignment: .center for ALL!
Use it!
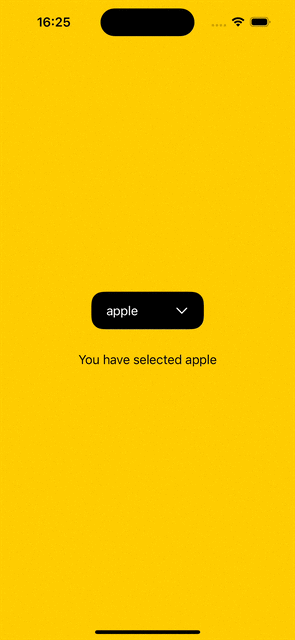
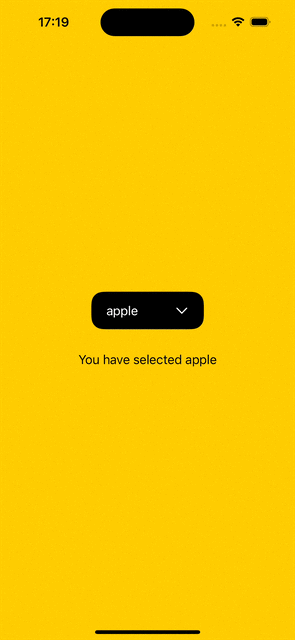
Let’s see how we can use our DropDownMenu really quick!
Note here that in order for us to be able to dismiss the menu on tap outside, we have also added an onTapGesture to our main view.
struct  DropDownMenuDemo: View {

let fruits = ["apple", "banana", "orange", "kiwi"]
@State  private  var selectedOptionIndex =  0
@State  private  var showDropdown =  false

var body: some  View {
VStack {
DropDownMenu(options: fruits, selectedOptionIndex: $selectedOptionIndex, showDropdown: $showDropdown)
Spacer()
.frame(height: 30)
Text("You have selected \(fruits[selectedOptionIndex])")

}
.frame(maxWidth: .infinity, maxHeight: .infinity, alignment: .center)
.background(Color.yellow)
.onTapGesture {
withAnimation {
showDropdown =  false
}
}
}
}
Show Selection Menu Above
If you want your Dropdown options menu to show up at top instead, only three changes are needed.
- put
**if** (showDropdown) {}above the selected item label, and - change
alignment: .toptoalignment: .bottomfor the most outside VStack - Reverse the chevron Image
struct  DropDownMenu: View {

let options: [String]

var menuWdith: CGFloat  =  150
var buttonHeight: CGFloat  =  50
var maxItemDisplayed: Int  =  3

@Binding  var selectedOptionIndex: Int
@Binding  var showDropdown: Bool

@State  private  var scrollPosition: Int?

var body: some  View {

VStack {

VStack(spacing: 0) {
if (showDropdown) {
let scrollViewHeight: CGFloat  = options.count > maxItemDisplayed ? (buttonHeight*CGFloat(maxItemDisplayed)) : (buttonHeight*CGFloat(options.count))
ScrollView {
LazyVStack(spacing: 0) {
ForEach(0..<options.count, id: \.self) { index in
Button(action: {
withAnimation {
selectedOptionIndex = index
showDropdown.toggle()
}

}, label: {
HStack {
Text(options[index])
Spacer()
if (index == selectedOptionIndex) {
Image(systemName: "checkmark.circle.fill")

}
}

})
.padding(.horizontal, 20)
.frame(width: menuWdith, height: buttonHeight, alignment: .leading)

}
}
.scrollTargetLayout()
}
.scrollPosition(id: $scrollPosition)
.scrollDisabled(options.count <=  3)
.frame(height: scrollViewHeight)
.onAppear {
scrollPosition = selectedOptionIndex
}

}
// selected item
Button(action: {
withAnimation {
showDropdown.toggle()
}
}, label: {
HStack(spacing: nil) {
Text(options[selectedOptionIndex])
Spacer()
Image(systemName: "chevron.up")
.rotationEffect(.degrees((showDropdown ?  -180 : 0)))
}
})
.padding(.horizontal, 20)
.frame(width: menuWdith, height: buttonHeight, alignment: .leading)

}
.foregroundStyle(Color.white)
.background(RoundedRectangle(cornerRadius: 16).fill(Color.black))

}
.frame(width: menuWdith, height: buttonHeight, alignment: .bottom)
.zIndex(100)

}
}
Thank you for reading!
That’s all I have for today!
Happy selecting!
Comments
Loading comments…