Zustand with Next.js 13 App Router

In this article, we’ll look at how to manage your state using Zustand in Client and Server components in NextJs 13 App router. Zustand is a very straightforward state management library. I suggest using Zustand in small to medium scaled projects as it is very simple to use and requires no boilerplate at all.
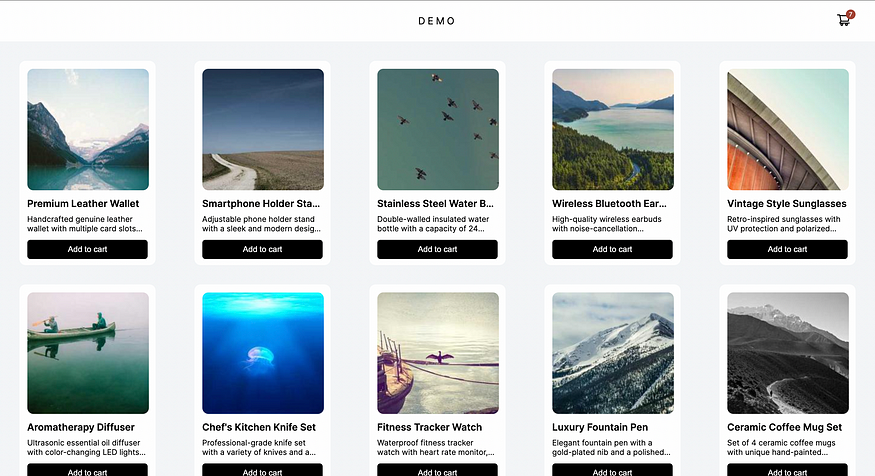
To understand how to use Zustand, we’ll building a collection page on an ecommerce app where clicking add to cart button will increase the cart size.
The code for this article is available in the github repo.
Step One: Installation
Create a new next app and install Zustand
npx create-next-app@latest
npm install zustand
You’ll also need to react-icons or any other icon library you prefer for this app.
npm install react-icons
Step Two: Build UI
- Replace
/app/page.jswith the code given below. You can also add some dummy json data/app/data/products.jsonfrom this link.
import styles from './page.module.css'
import products from './data/products.json'
import AddToCartButton from './components/AddToCartButton'
import CartButton from './components/CartButton'

export default function Home() {
  return (
    <div className={styles.container}>
      <div className={styles.header}>
        <p>DEMO</p>
        <CartButton />
      </div>
      <div className={styles.content}>
        {products.map((product, index) => (
          <div key={index} className={styles.item}>
            <img src={`${product.image}?sig=${index}`} alt={product.name} />
            <p className={styles.title}>{product.title}</p>
            <p className={styles.description}>{product.description}</p>
            <AddToCartButton />
          </div>
        ))}
      </div>
    </div>
  )
}
- Add
page.module.cssto add some styling to the page
.container {
  width: 100vw;
  background-color: #f3f5f7;
}

.header {
  background-color: #fff;
  width: 100vw;
  padding: 1.5rem;
  display: flex;
  align-items: center;
  justify-content: center;
  > p {
    color: #000;
    letter-spacing: 4px;
  }
}

.content {
  display: flex;
  flex-wrap: wrap;
  padding: 2rem;
  gap: 2rem;
  justify-content: space-between;
}

.item {
  background-color: #fff;
  width: 14rem;
  height: 21rem;
  border-radius: 10px;
  padding: 0.8rem;
  > img {
    border-radius: 10px;
  }
}

.title {
  margin-top: 0.5rem;
  color: #000;
  text-overflow: ellipsis;
  overflow: hidden;
  white-space: nowrap;
  font-weight: 600;
}

.description {
  color: #000;
  font-size: 0.8rem;
  margin-top: 0.5rem;

  display: -webkit-box;
  -webkit-line-clamp: 2;
  -webkit-box-orient: vertical;
  overflow: hidden;
}

button {
  background-color: #000;
  color: #fff;
  border: none;
  border-radius: 5px;
  padding: 0.5rem;
  margin-top: 0.7rem;
  cursor: pointer;
  transition: 0.3s;
  width: 100%;
  &:hover {
    background-color: #fff;
    color: #000;
  }
}
- Add
<AddToCartButton/>. This component will serve as our client component because this button needs to be interactive.
'use client'

import React from 'react'
export default function AddToCartButton() {
  return (
    <button
      onClick={() => {
        // do something
      }}
    >
      Add to cart
    </button>
  )
}
This is where we’ll be adding the Zustand action. We’ll add that once we have created a store.
- Add
<CartButton/>. This will be another client component which will change based on the action of user.
'use client'

import React from 'react'
import { AiOutlineShoppingCart } from 'react-icons/ai'

export default function CartButton() {
  return (
    <div style={{ position: 'absolute', right: 40 }}>
      <div
        style={{
          position: 'relative',
        }}
      >
        <AiOutlineShoppingCart fontSize={24} color="#000" />
        <div
          style={{
            width: '1rem',
            height: '1rem',
            background: '#a34437',
            position: 'absolute',
            borderRadius: '50%',
            display: 'flex',
            justifyContent: 'center',
            alignItems: 'center',
            right: -8,
            top: -5,
          }}
        >
          <p
            style={{
              fontSize: '0.6rem',
            }}
          >
            // show the number of items in the cart
          </p>
        </div>
      </div>
    </div>
  )
}
Step 3: Add Zustand Store
- Create
/app/store/useCart.js. We’ll be creating our Zustand store in this file. It’ll be fairly simple with one variablecountto keep track of number of items in the cart, functionaddToCart()which will be used to increment the value of count. We have another function calledremoveAllCart()to reset the count.
import { create } from 'zustand'

const useCart = create((set) => ({
  count: 0,
  addToCart: () => set((state) => ({ count: state.count + 1 })),
  removeAllCart: () => set({ count: 0 }),
}))

export default useCart
- Call
addToCart()function in the<AddToCartButton/>component. Make sure this component uses “use client” directive.
'use client'

import React from 'react'
import useCart from '../store/useCart'
export default function AddToCartButton() {
  const addToCart = useCart((state) => state.addToCart)
  return (
    <button
      onClick={() => {
        // ADD HERE
        addToCart()
      }}
    >
      Add to cart
    </button>
  )
}
- Show the count in
<CartButton/>
'use client'

import React from 'react'
import { AiOutlineShoppingCart } from 'react-icons/ai'
import useCart from '../store/useCart'

export default function CartButton() {
  const { count } = useCart()
  return (
    <div style={{ position: 'absolute', right: 40 }}>
      <div
        style={{
          position: 'relative',
        }}
      >
        <AiOutlineShoppingCart fontSize={24} color="#000" />
        <div
          style={{
            width: '1rem',
            height: '1rem',
            background: '#a34437',
            position: 'absolute',
            borderRadius: '50%',
            display: 'flex',
            justifyContent: 'center',
            alignItems: 'center',
            right: -8,
            top: -5,
          }}
        >
          <p
            style={{
              fontSize: '0.6rem',
            }}
          >
            {count}
          </p>
        </div>
      </div>
    </div>
  )
}
Step 4: Test the app
You can check the video at the GitHub repo to make sure it works the same for you.
Note: To use Zustand in server components, you can directly use useCart.getState().count . However, its functionality is quite limited as only the default value will be fetched and it won't respond to any changes once the DOM is hydrated.