Photo by Rubaitul Azad on Unsplash
Next.js is a React framework that can be used to build static and dynamic websites and web applications. It is known for its performance, SEO, and scalability.
In this article, we will talk about:
∘ Setting up MySQL Server Locally
∘ REST API
∘ Create Next.js app
∘ Create an API
∘ Installing mysql2 library
∘ Environment Variables
∘ Using mysql2 and running a query
∘ Passing values to the query
Next.js goes a long way providing an integrated environment for application development which includes developing a RESTful API for your application (or just an API by itself). In this article, I will show you how to connect to a MySQL server from a Next.js API. We will use the mysql2 package to make the connection.
Setting up MySQL Server Locally
MySQL is a popular relational database management system (RDBMS) that is used to store data in tables. If you have MySQL server installed on your machine already, that is excellent. If you don’t, no worries. Follow the steps in my article Setting up MySQL server on local machine to get your MySQL server installed and setup on your local machine.
This article assumes minimal knowledge of JavaScript, Next.js, and MySQL and SQL script.
REST API
API’s are important for applications which maintain data in databases or data sources. It keeps the data layer separate from the application UI for security and ease of enhancement purposes, among other important benefits.
As per the definition of TechTarget:
A RESTful API is an architectural style for an application program interface (API) that uses HTTP requests to access and use data. That data can be used to GET, PUT, POST and DELETE data types, which refers to the reading, updating, creating and deleting of operations concerning resources.
You can refer to the link above for more details about REST API. We will see later how GET and POST methods are used.
Create Next.js app
I’ll be using the latest Next.js release and will be implementing the app routing convention, so let’s get started by creating a new Next.js application. I’m calling my application next_mysql, but u can call it anything you like.
npx create-next-app@latest next_mysql
Use the following options:
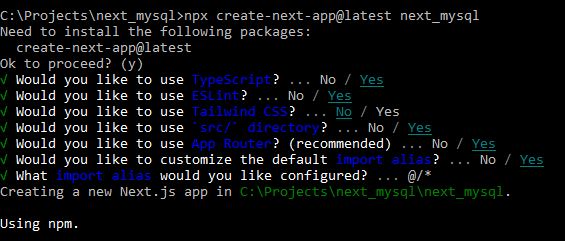
I’ll be using TypeScript, ESLint, ‘src/’ directory, App router and import alias. I won’t be using Tailwind.
Create an API
Now that the application is created, let’s create a simple API route which returns a JSON object with a “Hello World!” message.
Open the application folder in your preferred code editor, mine is Visual Studio Code, and go to “src\” folder. In there you will find the “app\” folder.
In side “app\” folder, create a new folder and call it “api”. This will be the folder containing our API routes.
We want to get an API response when we try “http://localhost:3000/api”, so I’ll create an API route in the “api\” folder directly. Inside the new “api\” folder, create a new file and call it “route.ts”. Next.js will refer to any route.ts in folders inside “api\” as routes for API calls and will run them.
In the new “route.ts” file, I’ll create API handler(s) for the API request(s). I’ll define NextRequest and NextResponse classes to handle the API request(s) and response(s), a GET handler function, and inside it, I’ll respond with a JSON object containing the message. My code looks like this:
// import the Request and Response classes

import { NextResponse, NextRequest } from 'next/server'

// define and export the GET handler function

export async function GET(request: Request) {
  // this is going to be my JSON response

  const results = {
    message: 'Hello World!',
  }

  // response with the JSON object

  return NextResponse.json(results)
}
It’s a simple API handler. Run the application using npm run dev and in your browser, go to http://loaclhost:3000 (assuming you didn’t change the default application run port 3000). This will display the application home page. Go back again to the URL bar and go to http://localhost:3000/api and see what you get. What you should expect is something like:

You should see a JSON object with a “message” property and value “Hello World!”.
If you are getting that, then our test API route was successful and we can move on to connecting to MySQL server in our next API route. 😃
We might be passing URL query parameters so if you are not that familier with this practice, please refer to my article URL Query params & Dynamic Route params in Next.js for more info.
Installing mysql2 library
To be able to connect to your MySQL server and execute queries, you will need to install mysql2 library. To do that, u can either use npmo r yarn.
npm install --save mysql2

yarn add mysql2
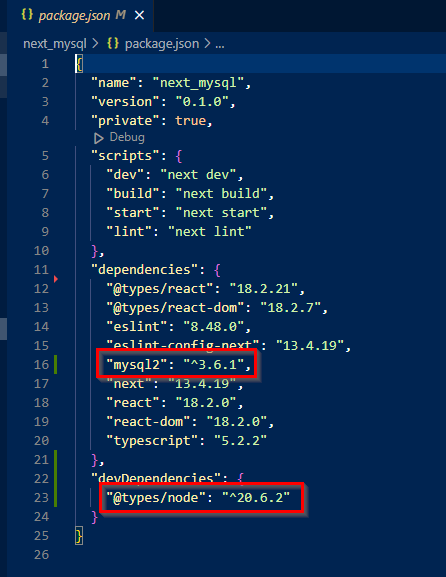
If you are using TypeScript you will need to install @types/node.
npm install --save-dev @types/node
After installation, you should be able to see them in package.json file.
Once installed, we can import it in our API route.ts files. Let’s create a new API folder called ‘mysql’ which will contain out API methods to GET or POST to MySQL server.
Inside the new ‘mysql’ folder, create another folder called ‘students’ and add to it a ‘route.ts’ file. Like this:
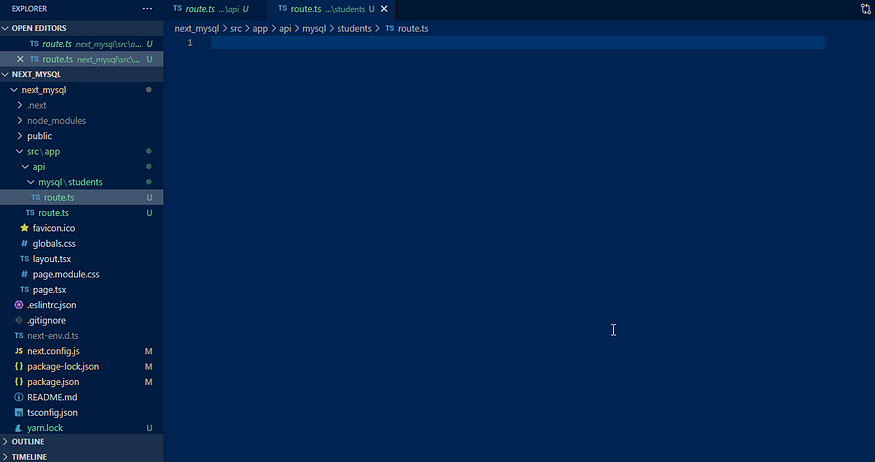
Let’s copy everything from the route.ts we created earlier because that was the most basic code for the API route file, and past them in the new route.ts file in ‘students’ folder.
After that, we need to import the ‘mysql’ class from ‘mysql2/promis’. At the very top of top of the file and along with the other imports, add the following:
import mysql from 'mysql2/promise';
We will be using the same ‘students’ database with the ‘std_profile’ table I’ve created in my example in my article Setting up MySQL server on local machine, and we want to have a GET method to retrieve all the students profiles in that table.
We will need to do the following:
- Create a connection object containing the connection parameters
- Create a response object interface
- Create a GET function (already copied from earlier file)
- Connect to MySQL database
- Create and execute a query
- Send a Response
- Disconnect from MySQL database
Starting with creating a connection parameters object which will be used to connect to the MySQL server and database, we need to have the following details:
- host: in our case, it is ‘localhost’.
- port: the MySQL server port, as a standard it is 3306.
- user: the username to be used to connect to MySQL.
- password: the password to be used to connect to MySQL.
- database: the database name to connect to. In our case, it is ‘students’.
So, I can go with doing the following after the imports and before the GET function:
let connectionParams = {
host: 'localhost',
port: 3306,
user: 'root',
password: '********',
database: 'students'
}
But there is an issue with approach. First, if you want to update these parameters, you will have to go every place they are used and change them. Second, this way exposes your credentials which presents a safety and security risk.
Environment Variables
💡 Next.js offers a way to define and access process environment variables in a secured way by defining them in
next.config.jsfile and accessing them throughprocess.envobject.
The better way is to go to next.config.js file and add a property to nextConfig object called env and add the parameters there. It is a good practice to have 2 sets of parameters. One for the development environment and one for the production environment. We will see how we can get the parameters based on the environment. So this is how next.config.js looks for now:
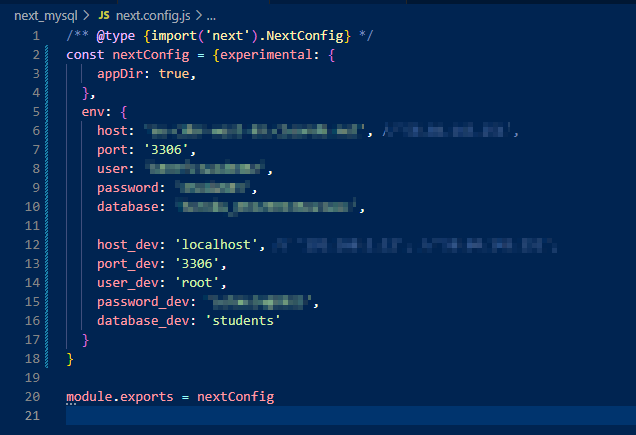
I have two sets of environment variables. The above group is for production and the below ones for development.
To retrieve these variables, I’ll create a function, I’ll call it GetDBSettings, and I’ll use it to retrieve these variables. Create a folder under ‘\src’ and call it ‘sharedCode’ to put common codes and functions in there. You can call it whatever you like as long as you refer it properly in imports. Create a file in this new folder called ‘common.ts’, again, you can call it whatever you like, and put the below code in there:
export interface IDBSettings {
  host: string

  port: number

  user: string

  password: string

  database: string
}

export const GetDBSettings = (): IDBSettings => {
  const env = process.env.NODE_ENV

  if (env == 'development')
    return {
      host: process.env.host_dev!, //'58.84.143.251',

      port: parseInt(process.env.port_dev!),

      user: process.env.user_dev!,

      password: process.env.password_dev!,

      database: process.env.database_dev!,
    }
  else
    return {
      host: process.env.host!, //'58.84.143.251',

      port: parseInt(process.env.port!),

      user: process.env.user!,

      password: process.env.password!,

      database: process.env.database!,
    }
}
Explaining the above, I’ve created an interface, IDBSettings, to be the type for my connectionParams object. On line 10, I’ve retrieved the environment nature, whether it is ‘development’ or otherwise. That wll depend on your pipeline deployments if you have ‘testing’, ‘staging’ and so on. I’ll be having either ‘development’ or ‘production’. Then, based on the environment value, I’ll get the parameters using the global processing.env object.
💡 You might’ve noticed, I’ve used TypeScript’s “Non-null assertion operator”, the !, with the variable names to tell the TS compiler that these variables will not be null for sure. With out this operator, you will probably get “ Type ‘undefined’ is not assignable to type ‘string’.ts(2345)” error.
If you still have questions on the above, let me know in the comments.
Now let’s go back to our route.ts file.
Using mysql2 and running a query
In “src\app\api\mysql\students\route.ts”, we’ll be adding a GET API method to connect and fetch the students profile data from database. At this point, we wil not be passing any query parameters to the API. Just fetching all the data from database unfiltered.
We will be implementing the following steps:
- Populate the connection parameters object, “connectionParams”, using the GetDBSettings() function we created earlier to get the environment variables corresponding to the database connection.
- Connect to database using mysql.createConnection() method.
- Create the SQL query to fetch data.
- Execute the query and retrieve the results using mysql.execute() method.
- Close the connection when done using mysql.end() method.
- Return the results as a JSON API response. I’m using NextResponse as the class to return the API response.
Including the necessary imports (NextResponse for the response, mysql for the MySQL DB connection, and our GetDBSettigns() function and interface), here is how our API route.ts file will look like.
// import the Request and Response classes

import { NextResponse, NextRequest } from 'next/server'

// import mysql2/promise for mysql connectivity

import mysql from 'mysql2/promise'

// import GetDBSettings to retrieve the database connection environment parameters,

// and the IDBSettings object interface

import { GetDBSettings, IDBSettings } from '@/sharedCode/common'

// 1. populate the connection parameters

let connectionParams = GetDBSettings()

// define and export the GET handler function

export async function GET(request: Request) {
  try {
    // 2. connect to database

    const connection = await mysql.createConnection(connectionParams)

    // 3. create a query to fetch data

    let get_exp_query = ''

    get_exp_query = 'SELECT * FROM students.std_profile'

    // we can use this array to pass parameters to the SQL query

    let values: any[] = []

    // 4. exec the query and retrieve the results

    const [results] = await connection.execute(get_exp_query, values)

    // 5. close the connection when done

    connection.end()

    // return the results as a JSON API response

    return NextResponse.json(results)
  } catch (err) {
    console.log('ERROR: API - ', (err as Error).message)

    const response = {
      error: (err as Error).message,

      returnedStatus: 200,
    }

    return NextResponse.json(response, { status: 200 })
  }
}
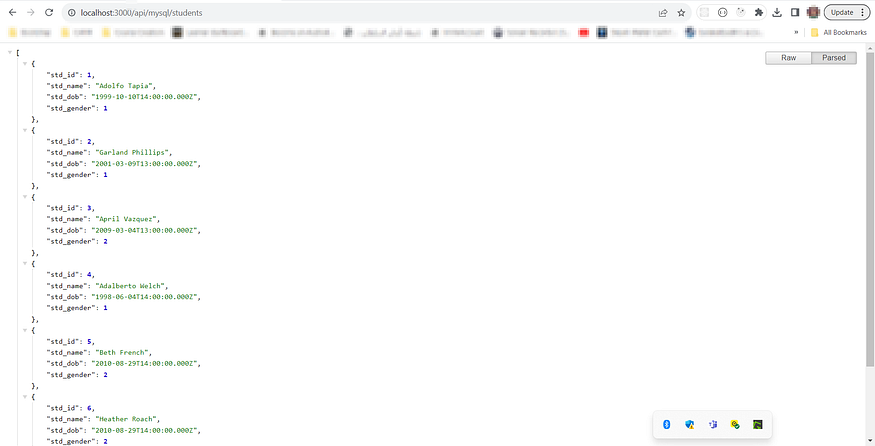
Run the bellow URL in your browser and you should get a listing of the students’ profiles as JSON object.
http://localhost:3000/api/mysql/students
So, you should expect something similar to (may be not exactly the same as) this:
You can actually destructure mysql2.execute() return to get the fields of the query result along with the results. The command will be like:
const [results, fields] = await connection.execute(get_exp_query, values)
The returned result will contain two objects. The result rows array and the array of objects representing fields details. You can return the list of fields’ names along with the results if you need them like this:
return NextResponse.json({ fields: fields.map((f) => f.name), results })
Passing values to the query
In this exmple, we will be passing some query parameters in the API call and we’ll use them in our query to filter the data we want. Let’s say, we want to select students who’s date of birth is with a certain range. So we’ll be passing twp parameters, dobFrom and dobTo as our query params.
💡 If you are not that familier with passing query parameters to API calls, or you want to refresh your memory, please refer to my article URL Query params & Dynamic Route params in Next.js for more info.
We will be passing the parameters in the API URL, so it is something like:
http://localhost:3000/api/mysql/students?dobfrom=1999-01-01&dobto=2000-01-01
Few modifications will have to be made in the above “route.ts” code.
- The GET method’s request type will have to be changed to NextRequest so we can use the nextUrl.searchParams.get() to retrieve the query params.
- Define and initialize dobFrom and dobTo as string variables.
- Fetch the query params of dobfrom and dobto and assign them to their variables respectively.
- Adjust the SQL query wo include WHERE clause to filter out the students rows based on their DOB.
- Add the dobFrom and dobTo to the SQL query.
The first 2 steps are easy and straight forward, and for the 3rd step, you’ll have to include the below 2 commands inside your try…catch… block to fetch the passed params:
dobFrom = request.nextUrl!.searchParams!.get('dobfrom')!;
dobTo = request.nextUrl!.searchParams!.get('dobto')!;
Now, for steps 4 and 5, this will really depend on how you want to pass the params in the query.
There are two ways we can pass the paramters in the SQL query. The first is by direct insertion in the query string, like:
get_exp_query = `SELECT * FROM students.std_profile WHERE std_dob BETWEEN '${dobFrom}' AND '${dobTo}'`;
And as you can see, with more paramters to be handled in the query, this wool look ugly and confusing, not to mention that you’ll have to handle the values qouting for non-numeric values, so it is not really our first.
The other way is to use placeholders, ‘?’, in the query and pass the params values as an array in the mysql2.execute() method. This is more cleaner, proper, and safer way to handle the params. If you recall from the ealier route.ts code, we had an array variable called values defined but assigned an empty array. This array will now be used to contain these params. 😃
Our SQL query and values code will look like this:
let get_exp_query = ''
get_exp_query = 'SELECT * FROM students.std_profile WHERE std_dob BETWEEN ? AND ?'

// we can use this array to pass parameters to the SQL query
let values: any[] = [dobFrom, dobTo]
We don’t need to put quotes for non-numeric values around the placeholders as they will handled by the query preparation by mysql2.
💡 You can read more How prepared statements can protect from SQL Injection attacks
The new code for the “route.ts” will be:
// import the Request and Response classes

import { NextResponse, NextRequest } from 'next/server'

// import mysql2/promise for mysql connectivity

import mysql from 'mysql2/promise'

// import GetDBSettings to retrieve the database connection environment parameters,

// and the IDBSettings object interface

import { GetDBSettings, IDBSettings } from '@/sharedCode/common'

// 1. populate the connection parameters

let connectionParams: IDBSettings = GetDBSettings()

// define and export the GET handler function

export async function GET(request: NextRequest) {
  let dobFrom = ''

  let dobTo = ''

  try {
    dobFrom = request.nextUrl!.searchParams!.get('dobfrom')!

    dobTo = request.nextUrl!.searchParams!.get('dobto')!

    console.log({ dobFrom, dobTo })

    // 2. connect to database

    const connection = await mysql.createConnection(connectionParams)

    // 3. create a query to fetch data

    let get_exp_query = ''

    get_exp_query = 'SELECT * FROM students.std_profile WHERE std_dob BETWEEN ? AND ?'

    // we can use this array to pass parameters to the SQL query

    let values: any[] = [dobFrom, dobTo]

    // 4. exec the query and retrieve the results

    const [results, fields] = await connection.execute(get_exp_query, values)

    // 5. close the connection when done

    connection.end()

    // return the results as a JSON API response

    return NextResponse.json({ fields: fields.map((f) => f.name), results })
  } catch (err) {
    console.log('ERROR: API - ', (err as Error).message)

    const response = {
      error: (err as Error).message,

      returnedStatus: 200,
    }

    return NextResponse.json(response, { status: 200 })
  }
}
You can also use mysql2.query() the same way to run a SQL query. I’ve included an example of that in my complete project which you can download from https://github.com/badih76/next_mysql.git.
💡 For more info and details about mysql2, check out https://www.npmjs.com/package/mysql2.
That’s, basically, it. 😃
Thanks for your reading and interest in my topic. I hope this was useful and fun. Please, don’t forget to follow me if you are not yet a follower and leave your comments. Your claps 👏 are very much appreciated. 😁
Comments
Loading comments…